2012年2月26日 星期日

glibc讀書心得 -- Ch1 Introduction


1.1 Getting Started
C語言並沒有內建一些常用的操作,如input/output、memory management等等,這些通通被定義在Standard Library中(glibc)。

1.2 Standards and Portability
glibc參考的C Library標準有ISO C(American National Standard X3.159-1989—“ANSI C” and later by the International Standardization Organization (ISO): ISO/IEC 9899:1990, “Programming languages—C”.)和POSIX兩個。以及參考System V和Berkeley UNIX兩個實做而成。

1.3 Using the Library
Library在C主要由兩個部份組成:
  1. header files that define types and macros and declare variables and functions
  2. the actual library or archive that contains the definitions of the variables and functions.
為了能使用glibc,你必須將所需的header file,用#include這個preprocessor directive將其引入,嚴格來說,您可以不必include這些header file,只要您可以正確的宣告相關的變數、巨集等等,不過為了效率和能正確的宣告相關變數,我們都會採用header file的形式,將其引入(include)。至於Macro的部份就參考我之前的C preprocessor的文章GCC - C Preprocessor應該會更清楚。
關於Reserved Names個人覺得還蠻重要的,就直接貼出來了:
  1. Names beginning with a capital ‘E’ followed a digit or uppercase letter may be used for additional error code names. See Chapter 2 [Error Reporting], page 13.
  2. Names that begin with either ‘is’ or ‘to’ followed by a lowercase letter may be used for additional character testing and conversion functions. See Chapter 4 [Character Handling], page 65.
  3. Names that begin with ‘LC_’ followed by an uppercase letter may be used for additional macros specifying locale attributes. See Chapter 7 [Locales and Internationalization], page 150.
  4. Names of all existing mathematics functions (see Chapter 19 [Mathematics], page 466) suffixed with ‘f’ or ‘l’ are reserved for corresponding functions that operate on float and long double arguments, respectively.
  5. Names that begin with ‘SIG’ followed by an uppercase letter are reserved for additional signal names. See Section 24.2 [Standard Signals], page 592.
  6. Names that begin with ‘SIG_’ followed by an uppercase letter are reserved for additional signal actions. See Section 24.3.1 [Basic Signal Handling], page 600.
  7. Names beginning with ‘str’, ‘mem’, or ‘wcs’ followed by a lowercase letter are reserved for additional string and array functions. See Chapter 5 [String and Array Utilities], page 73.
  8. Names that end with ‘_t’ are reserved for additional type names.

    參考資料:
  1. The GNU C Library, Chapter 1


2012年1月29日 星期日

JSON-C


JSON-C是一套用C寫的JSON format的parser和generator,可以將JSON字串正確parse,並且存成json_object進行操作(新增/刪除/修改),也可以將json_object轉成JSON字串,個人還蠻推薦的。

官方網站:JSON-C

安裝步驟
brook@vista:~/src$ git clone https://github.com/json-c/json-c.git json-c
Cloning into json-c...
remote: Counting objects: 448, done.
remote: Compressing objects: 100% (169/169), done.
remote: Total 448 (delta 315), reused 405 (delta 274)
Receiving objects: 100% (448/448), 125.68 KiB | 76 KiB/s, done.
Resolving deltas: 100% (315/315), done.
brook@vista:~/src$ cd json-c/
brook@vista:~/src/json-c$ ./autogen.sh
autoreconf: Entering directory `.'
autoreconf: configure.in: not using Gettext
autoreconf: running: aclocal 
autoreconf: configure.in: tracing
autoreconf: running: libtoolize --install --copy
libtoolize: Consider adding `AC_CONFIG_MACRO_DIR([m4])' to configure.in and
libtoolize: rerunning libtoolize, to keep the correct libtool macros in-tree.
libtoolize: Consider adding `-I m4' to ACLOCAL_AMFLAGS in Makefile.am.
autoreconf: running: /usr/bin/autoconf
autoreconf: running: /usr/bin/autoheader
autoreconf: running: automake --add-missing --copy --no-force
autoreconf: Leaving directory `.'
brook@vista:~/src/json-c$ ./configure
checking for a BSD-compatible install... /usr/bin/install -c
checking whether build environment is sane... yes
checking for a thread-safe mkdir -p... /bin/mkdir -p
...
brook@vista:~/src/json-c$ make
make  all-am
make[1]: Entering directory `/home/brook/src/json-c'
/bin/bash ./libtool --tag=CC   --mode=compile gcc -DHAVE_CONFIG_H -I.    -Wall -Wwrite-strings -Werror -std=gnu99 -D_GNU_SOURCE -D_REENTRANT -g -O2 -MT arraylist.lo -MD -MP -MF .deps/arraylist.Tpo -c -o arraylist.lo arraylist.c
...
brook@vista:~/src/json-c$ make check
make  test1 test2 test4 test_parse_int64 test_null test_cast
make[1]: Entering directory `/home/brook/src/json-c'
gcc -DHAVE_CONFIG_H -I.    -Wall -Wwrite-strings -Werror -std=gnu99 -D_GNU_SOURCE -D_REENTRANT -g -O2 -MT test1.o -MD -MP -MF .deps/test1.Tpo -c -o test1.o test1.c
test1.c: In function ‘sort_fn’:
test1.c:14:8: error: assignment discards ‘const’ qualifier from pointer target type [-Werror]
test1.c:15:8: error: assignment discards ‘const’ qualifier from pointer target type [-Werror]
cc1: all warnings being treated as errors

make[1]: *** [test1.o] Error 1
make[1]: Leaving directory `/home/brook/src/json-c'
make: *** [check-am] Error 2
brook@vista:~/src/json-c$ sed -i 's/-Werror //' Makefile
brook@vista:~/src/json-c$ make check
make  test1 test2 test4 test_parse_int64 test_null test_cast
make[1]: Entering directory `/home/brook/src/json-c'
...
brook@vista:~/src/json-c$ ./test1
my_string= 
my_string.to_string()="\t"
my_string=\
my_string.to_string()="\\"
my_string=foo
my_string.to_string()="foo"
my_int=9
my_int.to_string()=9
my_array=
 [0]=1
 [1]=2
 [2]=3
 [3]=null
 [4]=5
...


Parser
可以利用json_tokener_parse()直接將字串轉成json_object,或是利用json_object_from_file()直接將檔案轉成json_object。
#include <stdio.h>
#include <stdlib.h>
#include <stddef.h>
#include <string.h>

#include "json.h"


int main(int argc, char **argv)
{
  json_object *new_obj;

  MC_SET_DEBUG(1);

  new_obj = json_tokener_parse("/* more difficult test case */ { \"glossary\": { \"title\": \"example glossary\", \"GlossDiv\": { \"title\": \"S\", \"GlossList\": [ { \"ID\": \"SGML\", \"SortAs\": \"SGML\", \"GlossTerm\": \"Standard Generalized Markup Language\", \"Acronym\": \"SGML\", \"Abbrev\": \"ISO 8879:1986\", \"GlossDef\": \"A meta-markup language, used to create markup languages such as DocBook.\", \"GlossSeeAlso\": [\"GML\", \"XML\", \"markup\"] } ] } } }");
  printf("new_obj.to_string()=%s\n", json_object_to_json_string(new_obj));
  json_object_put(new_obj);

  return 0;
}


Generator基本上就是用json_object_to_json_string()將json_object轉成字串。

更多的範例可以參考source code裡面的test1.c。


2011年12月18日 星期日

Turn your Linux computer into a wireless access point using hostapd


話說手持無線裝置越來越多,習慣晚上用我的android手機上網,不過有天竟然把AP帶回老家忘記帶回來,只好拿我的HP Compaq CQ45來充當AP了,網路上已經很多Turn your Linux computer into a wireless access point using hostapd這類的文章了,我就不多加闡述,只是單純的紀錄。
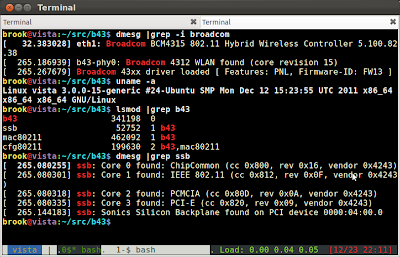
我的CQ45的網卡是Broadcom的Chip,用的Linux kernel是3.0.0,預設的wireless driver是去load wl.ko,產生的interface name是eth1,不過hostap好像不支援,也沒去深究他,索性把他換成舊的b43.ko,然後簡單設定一下hostapd.conf就執行hostapd了。

hostapd.conf
ssid=test
hw_mode=g
channel=1
interface=wlan1
#bridge=br1
driver=nl80211
ignore_broadcast_ssid=0
macaddr_acl=0
wmm_enabled=0

接著還要設定wireless的IP,不過我並沒有啟動DHCP server,Client端就用靜態IP吧。

接著還要讓我的NB具有route和NAT的功能,請執行
sudo iptables -t nat -A POSTROUTING -o ppp0 -j MASQUERADE
sudo sysctl -w sys.net.ipv4.conf.all.forwarding=1


熱門文章