2015年12月26日 星期六

OpenEmbedded -- Creating and using an SDK


SDK包含了開發時所需的相關檔案,有些還包含了整個開發環境(tool/command),避免系統的tool/command跟SDK需要的不同造成的error,一個SDK應該包含以下內容:(YOCTO Slides)
  1. Compilers or cross-compilers
  2. Linkers
  3. Library headers
  4. Debuggers
  5. Custom utilities


這篇文章就是在介紹如何使用Openembedded建立一個generic SDK供他人開發application,使用指令bitbake -v meta-toolchain即可產生generic SDK,並產生一個install的script,放置於oe/oe-core/build/tmp-eglibc/deploy/sdk/底下,執行過程如下
brook@vista:/home/brook/oe/oe-core/build$ bitbake -v meta-toolchain

...

+ chmod +x /home/brook/oe/oe-core/build/tmp-eglibc/deploy/sdk/oecore-x86_64-armv7a-vfp-neon-toolchain-oe-core.0.sh

+ cat /home/brook/oe/oe-core/build/tmp-eglibc/deploy/sdk/oecore-x86_64-armv7a-vfp-neon-toolchain-oe-core.0.tar.bz2

+ rm /home/brook/oe/oe-core/build/tmp-eglibc/deploy/sdk/oecore-x86_64-armv7a-vfp-neon-toolchain-oe-core.0.tar.bz2


NOTE: Tasks Summary: Attempted 1685 tasks of which 1312 didn't need to be rerun and all succeeded.
brook@vista:/home/brook/oe/oe-core/build$ tree tmp-eglibc/deploy/sdk/
tmp-eglibc/deploy/sdk/
`-- oecore-x86_64-armv7a-vfp-neon-toolchain-oe-core.0.sh

0 directories, 1 file

接著直要將底下的script(oecore-x86_64-armv7a-vfp-neon-toolchain-oe-core.0.sh)給developer開發即可,-d後面帶安裝目錄,安裝過程需要SUDO權限,
brook@vista:/home/brook/oe/oe-core/build$ ./tmp-eglibc/deploy/sdk/oecore-x86_64-armv7a-vfp-neon-toolchain-oe-core.0.sh --help
Usage: oecore-x86_64-armv7a-vfp-neon-toolchain-oe-core.0.sh [-y] [-d <dir>]
  -y         Automatic yes to all prompts
  -d <dir>   Install the SDK to <dir>
======== Advanced DEBUGGING ONLY OPTIONS ========
  -S         Save relocation scripts
  -R         Do not relocate executables
  -D         use set -x to see what is going on
brook@vista:~$ /home/brook/oe/oe-core/build/tmp-eglibc/deploy/sdk/oecore-x86_64-armv7a-vfp-neon-toolchain-oe-core.0.sh -d /opt/oe -D
+ printf 'Enter target directory for SDK (default: /usr/local/oecore-x86_64): '
Enter target directory for SDK (default: /usr/local/oecore-x86_64): + '[' /opt/oe = '' ']'
+ echo /opt/oe
/opt/oe

...

+ '[' 0 = 0 ']'
+ /usr/bin/sudo rm /SSD/opt/oe/relocate_sdk.py /SSD/opt/oe/relocate_sdk.sh
+ echo 'SDK has been successfully set up and is ready to be used.'
SDK has been successfully set up and is ready to be used.
+ exit 0

要使用SDK之前,必須先source安裝目錄下開頭為environment-setup-的script,設置相關的環境變數,我的script內容如下
export PATH=/SSD/opt/oe/sysroots/x86_64-oesdk-linux/usr/bin:/SSD/opt/oe/sysroots/x86_64-oesdk-linux/usr/bin/armv
7a-vfp-neon-oe-linux-gnueabi:$PATH
export PKG_CONFIG_SYSROOT_DIR=/SSD/opt/oe/sysroots/armv7a-vfp-neon-oe-linux-gnueabi
export PKG_CONFIG_PATH=/SSD/opt/oe/sysroots/armv7a-vfp-neon-oe-linux-gnueabi/usr/lib/pkgconfig
export CONFIG_SITE=/SSD/opt/oe/site-config-armv7a-vfp-neon-oe-linux-gnueabi
export CC="arm-oe-linux-gnueabi-gcc  -march=armv7-a -mthumb-interwork -mfloat-abi=softfp -mfpu=neon -mthumb-inte
rwork --sysroot=/SSD/opt/oe/sysroots/armv7a-vfp-neon-oe-linux-gnueabi"
export CXX="arm-oe-linux-gnueabi-g++  -march=armv7-a -mthumb-interwork -mfloat-abi=softfp -mfpu=neon -mthumb-int
erwork --sysroot=/SSD/opt/oe/sysroots/armv7a-vfp-neon-oe-linux-gnueabi"
export CPP="arm-oe-linux-gnueabi-gcc -E  -march=armv7-a -mthumb-interwork -mfloat-abi=softfp -mfpu=neon -mthumb-interwork --sysroot=/SSD/opt/oe/sysroots/armv7a-vfp-neon-oe-linux-gnueabi"
export AS="arm-oe-linux-gnueabi-as "
export LD="arm-oe-linux-gnueabi-ld  --sysroot=/SSD/opt/oe/sysroots/armv7a-vfp-neon-oe-linux-gnueabi"
export GDB=arm-oe-linux-gnueabi-gdb
export STRIP=arm-oe-linux-gnueabi-strip
export RANLIB=arm-oe-linux-gnueabi-ranlib
export OBJCOPY=arm-oe-linux-gnueabi-objcopy
export OBJDUMP=arm-oe-linux-gnueabi-objdump
export AR=arm-oe-linux-gnueabi-ar
export NM=arm-oe-linux-gnueabi-nm
export M4=m4
export TARGET_PREFIX=arm-oe-linux-gnueabi-
export CONFIGURE_FLAGS="--target=arm-oe-linux-gnueabi --host=arm-oe-linux-gnueabi --build=x86_64-linux --with-libtool-sysroot=/SSD/opt/oe/sysroots/armv7a-vfp-neon-oe-linux-gnueabi"
export CFLAGS=" -O2 -fexpensive-optimizations -frename-registers -fomit-frame-pointer"
export CXXFLAGS=" -O2 -fexpensive-optimizations -frename-registers -fomit-frame-pointer -fpermissive"
export LDFLAGS="-Wl,-O1 -Wl,--hash-style=gnu -Wl,--as-needed"
export CPPFLAGS=""
export OECORE_NATIVE_SYSROOT="/SSD/opt/oe/sysroots/x86_64-oesdk-linux"
export OECORE_TARGET_SYSROOT="/SSD/opt/oe/sysroots/armv7a-vfp-neon-oe-linux-gnueabi"
export OECORE_ACLOCAL_OPTS="-I /SSD/opt/oe/sysroots/x86_64-oesdk-linux/usr/share/aclocal"
export OECORE_DISTRO_VERSION="20151225"
export OECORE_SDK_VERSION="oe-core.0"
export PYTHONHOME=/SSD/opt/oe/sysroots/x86_64-oesdk-linux/usr
export ARCH=arm
export CROSS_COMPILE=arm-oe-linux-gnueabi-


以下是我用這SDK編譯一個檔案,並放入target中執行
brook@vista:~$ source /opt/oe/environment-setup-armv7a-vfp-neon-oe-linux-gnueabi
brook@vista:~$ cat main.c
#include <stdio.h>

int main(int argc, char *argv[])
{
        printf("hello\n");
        return 0;
}

brook@vista:~$ $CC -o brook-sdk main.c

D:\Projects>adb push z:\brook-sdk /
688 KB/s (5644 bytes in 0.008s)

D:\Projects>adb shell chmod +x /brook-sdk

D:\Projects>adb shell /brook-sdk
hello

開發環境架構圖


    參考資料:
  1. Yocto Project and OpenEmbedded development course
  2. Yocto Project Quick Start -- SDK Generation


2015年12月19日 星期六

OpenEmbedded - Writing Meta Data for adding Kernel Module package


OpenEmbedded User Manual - CH3, Writing Meta Data (Adding packages)之後,這一篇是教導如何新增Kernel Module package。 BB檔的寫法與OpenEmbedded User Manual - CH3, Writing Meta Data (Adding packages)雷同,只是我們這次iherit的class是module

/oe-core/meta/recipes-kernel/brook/brook_1.0.bb

inherit module
DESCRIPTION = "Brook Out Tree Kernel Module"
LICENSE = "GPLv2"
LIC_FILES_CHKSUM = "file://LICENSE;md5=5ff2bd2dd80c7cc542a6b8de3ee4ff87"

PR = "r1-${KERNEL_VERSION}"

# This DEPENDS is to serialize kernel module builds
DEPENDS = "virtual/kernel"


SRC_URI = "file://brook.patch \
"

S = "${WORKDIR}/brook-linux-${PV}"

這邊的SRC_URI我是使用patch格式,當然你也可以使用zip格式,但是zip格式需要考慮目錄名稱必須為"${WORKDIR}/brook-linux-${PV}",即bb檔中的S,但是如果是patch就不用管S目錄名稱為何了。

完整檔案結構如下

後面會陸續介紹每個檔案
    /oe-core/meta/recipes-kernel/brook
    |-- brook_1.0.bb
    |-- files
    |   `-- brook.patch
    `-- git
        |-- LICENSE
        |-- Makefile
        `-- main.c


Makefile

ifneq ($(KERNELRELEASE),)
# obj-m := <module_name>.o
# <module_name>-y := <src1>.o <src2>.o ...

        EXTRA_CFLAGS += -DYAFFS_OUT_OF_TREE

        obj-m := brook.o

        brook-objs := main.o
else
        PWD := $(shell pwd)

modules:
 $(MAKE) -C $(KERNEL_SRC) M=$(PWD) modules

modules_install:
 $(MAKE) -C $(KERNEL_SRC) M=$(PWD) modules_install

clean:
 $(MAKE) -C $(KERNEL_SRC) M=$(PWD) clean
endif

這是一般的Kernel Module寫法,沒有特別的地方,Out Tree build時KERNELRELEASE為空字串,所以會用下面那段。

License的內容就只有"License: GPL"這個字串

main.c

Module的主程式,只是在init與exit時印出簡單字串而已。
#include <linux/module.h>

MODULE_AUTHOR("Brook");
MODULE_DESCRIPTION("Kernel module for demo");
MODULE_LICENSE("GPL");

static int __init brook_init(void)
{
        printk(KERN_INFO "Brook Module Init\n");
        return 0;
}
module_init(brook_init);

static void __exit brook_exit(void)
{
        printk(KERN_INFO "Brook Module Exit\n");
        return;
}
module_exit(brook_exit);


brook.patch

這是我把檔案全部放在git目錄底下,做source control,並用git format-patch產生的,將產生後的檔案放置files/brook.patch。


2015年12月13日 星期日

mkbootimg -- pack boot images utils


mkbootimg是Android project的一部分,用來封裝boot image的,其使用參數如下:
usage: mkbootimg
       --kernel <filename>
       --ramdisk <filename>
       [ --second <2ndbootloader-filename> ]
       [ --cmdline <kernel-commandline> ]
       [ --board <boardname> ]
       [ --base <address> ]
       [ --pagesize <pagesize> ]
       [ --ramdisk_offset <ramdisk_offset> ]
       [ --dt <filename> ]
       [ --tags-addr <address> ]
       -o|--output <filename>


基本上就是將kenrnel、ramdisk、device tree等封裝成一個檔案,讓boot loader能將其載入RAM中,並正確執行。檔案的layout如下(就如bootimg.h中註解所提到的,https://www.codeaurora.org/cgit/quic/femto/platform/system/core/tree/mkbootimg/bootimg.h?h=LNX.LE.5.0.1-57023-9x40)
/*
** +-----------------+ 
** | boot header     | 1 page
** +-----------------+
** | kernel          | n pages  
** +-----------------+
** | ramdisk         | m pages  
** +-----------------+
** | second stage    | o pages
** +-----------------+
** | device tree     | p pages
** +-----------------+
**
** n = (kernel_size + page_size - 1) / page_size
** m = (ramdisk_size + page_size - 1) / page_size
** o = (second_size + page_size - 1) / page_size
** p = (dt_size + page_size - 1) / page_size
**
** 0. all entities are page_size aligned in flash
** 1. kernel and ramdisk are required (size != 0)
** 2. second is optional (second_size == 0 -> no second)
** 3. load each element (kernel, ramdisk, second) at
**    the specified physical address (kernel_addr, etc)
** 4. prepare tags at tag_addr.  kernel_args[] is
**    appended to the kernel commandline in the tags.
** 5. r0 = 0, r1 = MACHINE_TYPE, r2 = tags_addr
** 6. if second_size != 0: jump to second_addr
**    else: jump to kernel_addr
*/

其中boot header會有一些information,讓LK能正確的將各個section load到正確的Address上,boot header定義如下
typedef struct boot_img_hdr boot_img_hdr;

#define BOOT_MAGIC "ANDROID!"
#define BOOT_MAGIC_SIZE 8
#define BOOT_NAME_SIZE 16
#define BOOT_ARGS_SIZE 512

struct boot_img_hdr
{
    unsigned char magic[BOOT_MAGIC_SIZE];

    unsigned kernel_size;  /* size in bytes */
    unsigned kernel_addr;  /* physical load addr */

    unsigned ramdisk_size; /* size in bytes */
    unsigned ramdisk_addr; /* physical load addr */

    unsigned second_size;  /* size in bytes */
    unsigned second_addr;  /* physical load addr */

    unsigned tags_addr;    /* physical addr for kernel tags */
    unsigned page_size;    /* flash page size we assume */
    unsigned dt_size;      /* device tree in bytes */
    unsigned unused;       /* future expansion: should be 0 */
    unsigned char name[BOOT_NAME_SIZE]; /* asciiz product name */
    
    unsigned char cmdline[BOOT_ARGS_SIZE];

    unsigned id[8]; /* timestamp / checksum / sha1 / etc */
};

第一個欄位magic用以識別這個image是否為有效,後續會帶著kernel、ramdisk、device tree跟second的size大小,以及要load的address。 以下是我的platform的FLASH與其RAM的layout,如下圖

基本上,main function就是將這些檔案pack成一個檔案,並做page alignment,有興趣再去看code吧。

下面這段是我寫的umkbootimg,讀取boot header資訊後印出。
#include <stdio.h>
#include <stdlib.h>
#include <string.h>
#include <unistd.h>
#include <fcntl.h>
#include <errno.h>
#include <stdlib.h>

#include "bootimg.h"

static void *load_file(const char *fn, unsigned sz)
{
    char *data;
    int fd;

    data = 0;
    fd = open(fn, O_RDONLY);
    if(fd < 0) return 0;

    data = (char*) malloc(sz);
    if(data == 0) goto oops;

    if(read(fd, data, sz) != sz) goto oops;
    close(fd);

    return data;

oops:
    close(fd);
    if(data != 0) free(data);
    return 0;
}

int usage(void)
{
    fprintf(stderr,"usage: umkbootimg <filename>\n");
    return 1;
}


int main(int argc, char **argv)
{
    boot_img_hdr *hdr;

    char *img_name = 0;
    void *img_data = 0;
    unsigned sz;

    if (argc < 2) {
        return usage();
    }

    hdr = (boot_img_hdr *) load_file(argv[1], sizeof(boot_img_hdr));
    hdr->magic[BOOT_MAGIC_SIZE] = 0;
    printf("magic:%s\n", hdr->magic);
    printf("kernel_size:%u/0x%08x\n", hdr->kernel_size, hdr->kernel_size);
    printf("kernel_addr:%u/0x%08x\n", hdr->kernel_addr, hdr->kernel_addr);

    printf("ramdisk_size:%u/0x%08x\n", hdr->ramdisk_size, hdr->ramdisk_size);
    printf("ramdisk_addr:%u/0x%08x\n", hdr->ramdisk_addr, hdr->ramdisk_addr);

    printf("second_size:%u/0x%08x\n", hdr->second_size, hdr->second_size);
    printf("second_addr:%u/0x%08x\n", hdr->second_addr, hdr->second_addr);

    printf("tags_addr:%u/0x%08x\n", hdr->tags_addr, hdr->tags_addr);

    printf("page_size:%u/0x%08x\n", hdr->page_size, hdr->page_size);

    printf("dt_size:%u/0x%08x\n", hdr->dt_size, hdr->dt_size);

    printf("name:%s\n", hdr->name);

    printf("cmdline:%s\n", hdr->cmdline);
    return 0;
}


    參考資料:
  • https://www.codeaurora.org/cgit/quic/femto/platform/system/core/tree/mkbootimg/bootimg.h?h=LNX.LE.5.0.1-57023-9x40


2015年9月29日 星期二

create an initramfs on mdm9x40


利用linux提供的script建立initramfs在先前的文章已經提過,可參考如何利用kvm/qemu練習linux module之new update,基本上就是呼叫gen_initramfs_list.sh建立file system清單,使用gen_init_cpio將清單轉成CPIO格式後,在使用gzip做壓縮。相關指令如下:
W=/home/brook/projects/9x40/apps_proc
RD=/home/brook/projects/initramfs
CPIO=/home/brook/projects/initramfs.cpio
SYSROOT=${W}/oe-core/build/tmp-eglibc/sysroots/
OUTPUT=/home/brook/projects/9x40-initramfs.img
sh ${W}/kernel/scripts/gen_initramfs_list.sh -d ${RD} > /tmp/gen_initramfs_list
${W}/oe-core/build/tmp-eglibc/sysroots/mdm9640/usr/src/kernel/usr/gen_init_cpio /tmp/gen_initramfs_list > ${CPIO}
gzip -c ${CPIO} > ${CPIO}.gz


我是copy recipes/linux-quic/linux-quic_git.bb裡面的do_deploy(),接著修改成另外一個script,來建立image,指令如下:
${SYSROOT}/x86_64-linux/usr/bin/mkbootimg --kernel ${SYSROOT}/mdm9640/boot/zImage-3.10.49 --dt ${SYSROOT}/mdm9640/boot/masterDTB --ramdisk ${CPIO}.gz --cmdline "dynamic_debug.verbose=1 root=/dev/ram rootfstype=ramfs console=ttyHSL0,115200,n8 androidboot.hardware=qcom ehci-hcd.park=3 msm_rtb.filter=0x37" --base 0x81C00000 --tags-addr 0x81900000 --pagesize 2048 --ramdisk_offset 0xd32000 --output ${OUTPUT}

這裡的重點是cmdline要改成"root=/dev/ram rootfstype=ramfs",否則在lk的lk/app/aboot/aboot.c:update_cmdline()會塞一些information給kernel,導致無法由initramfs開機。

相關檔案位置: https://www.codeaurora.org/cgit/quic/le/mdm/manifest/tree/?id=LNX.LE.5.0.1-57014-9x40
LNX.LE.5.0.1-57014-9x40.xml: repo manifest file,

https://www.codeaurora.org/cgit/quic/le/kernel/lk/tree/app/aboot/aboot.c?id=LNX.LE.5.0.1-57014-9x40
lk/app/aboot/aboot.c: unsigned char *update_cmdline(const char * cmdline)

https://www.codeaurora.org/cgit/quic/le/oe/recipes/tree/conf/machine/mdm9640.conf?h=LNX.LE.5.0.1_rb1.7
conf/machine/mdm9640.conf: MACHINE_KERNEL_TAGS_OFFSET = "0x81900000"

https://www.codeaurora.org/cgit/quic/le/oe/recipes/tree/recipes/linux-quic/linux-quic_git.bb?id=LNX.LE.5.0.1-57014-9x40
recipes/linux-quic/linux-quic_git.bb: do_deploy()


2015年6月20日 星期六

如何利用kvm/qemu練習linux module之new update


本文是如何利用kvm/qemu練習linux module的更新版。


brook@vista:~/qemu$ git clone git://git.kernel.org/pub/scm/linux/kernel/git/torvalds/linux.git linux
Cloning into 'linux'...
remote: Counting objects: 4153172, done.
remote: Compressing objects: 100% (548/548), done.
remote: Total 4153172 (delta 278), reused 0 (delta 0)
Receiving objects: 100% (4153172/4153172), 919.28 MiB | 2.32 MiB/s, done.
Resolving deltas: 100% (3423945/3423945), done.
Checking out files: 100% (49457/49457), done.
brook@vista:~/qemu$ cd linux/
brook@vista:~/qemu/linux$ git tag -l | tac | head -2
v4.1-rc8
v4.1-rc7
brook@vista:~/qemu/linux$ cp /boot/config-3.8.0-35-generic .config
brook@vista:~/qemu/linux$ make ARCH=i386 olddefconfig
  HOSTCC  scripts/basic/fixdep
  HOSTCC  scripts/kconfig/conf.o
  SHIPPED scripts/kconfig/zconf.tab.c
  SHIPPED scripts/kconfig/zconf.lex.c
  SHIPPED scripts/kconfig/zconf.hash.c
  HOSTCC  scripts/kconfig/zconf.tab.o
  HOSTLD  scripts/kconfig/conf
scripts/kconfig/conf  --olddefconfig Kconfig
.config:550:warning: symbol value 'm' invalid for ACPI_PCI_SLOT
.config:553:warning: symbol value 'm' invalid for ACPI_HOTPLUG_MEMORY
.config:665:warning: symbol value 'm' invalid for HOTPLUG_PCI_ACPI
.config:4522:warning: symbol value 'm' invalid for FB_VESA
.config:5062:warning: symbol value 'm' invalid for USB_ISP1760_HCD
.config:6150:warning: symbol value 'm' invalid for VME_BUS
#
# configuration written to .config
#
brook@vista:~/qemu/linux$ make ARCH=i386 all
scripts/kconfig/conf  --silentoldconfig Kconfig
  SYSTBL  arch/x86/syscalls/../include/generated/asm/syscalls_32.h
  SYSHDR  arch/x86/syscalls/../include/generated/uapi/asm/unistd_32.h
  SYSHDR  arch/x86/syscalls/../include/generated/uapi/asm/unistd_64.h
...(略)
  IHEX    firmware/yam/1200.bin
  IHEX    firmware/yam/9600.bin
brook@vista:~/qemu/linux$ cd ..
brook@vista:~/qemu$ git clone git://busybox.net/busybox.git
Cloning into 'busybox'...
remote: Counting objects: 91770, done.
remote: Compressing objects: 100% (23149/23149), done.
remote: Total 91770 (delta 71829), reused 86760 (delta 68061)
Receiving objects: 100% (91770/91770), 21.68 MiB | 805 KiB/s, done.
Resolving deltas: 100% (71829/71829), done.
brook@vista:~/qemu$ cd busybox
brook@vista:~/qemu/busybox$ make defconfig
scripts/kconfig/conf -d Config.in
*
* Busybox Configuration
...(略)
  Use the klogctl() interface (FEATURE_KLOGD_KLOGCTL) [Y/n/?] (NEW) y
logger (LOGGER) [Y/n/?] (NEW) y
brook@vista:~/qemu/busybox$ sed -i 's/.*CONFIG_STATIC.*/CONFIG_STATIC=y/' .config
brook@vista:~/qemu/busybox$ make CFLAGS="-m32" LDFLAGS="-m32" all
scripts/kconfig/conf -s Config.in
#
# using defaults found in .config
#
...(略)
  DOC     busybox.1
  DOC     BusyBox.html
brook@vista:~/qemu/busybox$ file busybox
busybox: ELF 32-bit LSB executable, Intel 80386, version 1 (SYSV), statically linked, for GNU/Linux 2.6.24, BuildID[sha1]=0x87675efbb7f7f810a462113cb2913bab73ffb1b6, stripped
brook@vista:~/qemu/busybox$ cd ..x
brook@vista:~/qemu$ ./create_initrd_by_linux_script.sh
+ INITD=initrd
+ rm -rf initrd
+ mkdir -p initrd/sbin initrd/bin initrd/sys initrd/tmp initrd/dev initrd/proc
+ mkdir -p initrd/usr/sbin initrd/usr/bin initrd/etc/init.d
+ install -m 0755 busybox/busybox initrd/bin
+ install -m 0755 init initrd/
+ ln -s ../bin/busybox initrd/sbin/mdev
+ ln -s busybox initrd/bin/sh
+ ln -s busybox initrd/bin/mkdir
+ ln -s busybox initrd/bin/mount
+ ./linux/scripts/gen_initramfs_list.sh -d initrd
+ ./linux/usr/gen_init_cpio /tmp/brook_initramfs_list
brook@vista:~/qemu$ qemu-system-i386 -kernel linux/arch/x86/boot/bzImage -initrd initrd.img


create_initrd_by_linux_script.sh

#!/bin/bash
INITD="initrd"
rm -rf ${INITD}
mkdir -p ${INITD}/sbin ${INITD}/bin ${INITD}/sys ${INITD}/tmp ${INITD}/dev ${INITD}/proc
mkdir -p ${INITD}/usr/sbin ${INITD}/usr/bin ${INITD}/etc/init.d
install -m 0755 busybox/busybox ${INITD}/bin
install -m 0755 init ${INITD}/
ln -s ../bin/busybox ${INITD}/sbin/mdev

ln -s busybox ${INITD}/bin/sh
ln -s busybox ${INITD}/bin/mkdir
ln -s busybox ${INITD}/bin/mount

./linux/scripts/gen_initramfs_list.sh -d ${INITD} > /tmp/brook_initramfs_list
./linux/usr/gen_init_cpio /tmp/brook_initramfs_list > initrd.img


2015年6月13日 星期六

apt-get update之更新non-LTS套件之解法


Ubuntu之非NON-LTS(Long Term Support)版本,通常9個月後就不再support,所以apt-get update更新往往就會看到找不到package的錯誤。 此時這些舊的package都會被移到http://old-releases.ubuntu.com/,所以要改一下路徑apt package的路徑。

brook@vista:~$ cat /etc/issue
Ubuntu 13.04 \n \l
 
brook@vista:~$ sudo apt-get update
[sudo] password for brook:
Ign http://extras.ubuntu.com raring Release.gpg
Ign http://archive.ubuntu.com raring Release.gpg
....
W: Failed to fetch http://security.ubuntu.com/ubuntu/dists/raring-security/main/binary-i386/Packages  404  Not Found [IP: 91.189.88.149 80]
 
W: Failed to fetch http://security.ubuntu.com/ubuntu/dists/raring-security/restricted/binary-i386/Packages  404  Not Found [IP: 91.189.88.149 80]
 
W: Failed to fetch http://security.ubuntu.com/ubuntu/dists/raring-security/universe/binary-i386/Packages  404  Not Found [IP: 91.189.88.149 80]
 
W: Failed to fetch http://security.ubuntu.com/ubuntu/dists/raring-security/multiverse/binary-i386/Packages  404  Not Found [IP: 91.189.88.149 80]
 
E: Some index files failed to download. They have been ignored, or old ones used instead.


Solution:

brook@vista:~$ cat /etc/apt/sources.list
#deb http://old-releases.ubuntu.com/ raring-security main
#deb http://old-releases.ubuntu.com/ubuntu/dists/raring-security/restricted/ raring-security main
deb http://old-releases.ubuntu.com/ubuntu/ raring main
deb http://old-releases.ubuntu.com/ubuntu/ raring universe


    參考資料:
  1. Ubuntu LTS(Long Term Support)
  2. Old Ubuntu Releases


2015年6月7日 星期日

LNK1123 error when bulding Visual Studio C++ 2010 project


今天忽然接到客戶指示要把NANE PIPE改成Socket,我就自告奮勇的協助,於是安裝完Visual Studio 2010後,第一個Hello World就出現了
LINK : fatal error LNK1123: failure during conversion to COFF: file invalid or corrupt

於是google了半天後,終於在安裝完VS 2010 SP1後解了


2015年5月10日 星期日

Gerrit How-to


先建立SSH Key

利用ssh-keygen產生ssh key,為了方便,我的passphrase是空白,這樣git操作時就不用問密碼了
brook@vista:~$ ssh-keygen
Generating public/private rsa key pair.
Enter file in which to save the key (/home/brook/.ssh/id_rsa):
Enter passphrase (empty for no passphrase):
Enter same passphrase again:
Your identification has been saved in /home/brook/.ssh/id_ras.
Your public key has been saved in /home/brook/.ssh/id_ras.pub.
The key fingerprint is:
be:5a:86:da:2f:9f:b1:fb:97:f1:bc:bd:30:ba:2a:56 brook@vista
The key's randomart image is:
+--[ RSA 2048]----+
|                 |
|                 |
|                 |
|                 |
|        S        |
|       o E  .    |
|      . *    B   |
|     o.= =  + =. |
|    . +=O+o+. .oo|
+-----------------+
brook@vista:~$ cat /home/brook/.ssh/id_ras.pub
ssh-rsa AAAAB3NzaC1yc2EAAAADAQABAAABAQDcyqsKymOWqwb3OhfYWaFltoKZQnlbJqAEkSf1vPCOxKzZLvCQm+tOxnikTdDDY61qqr+GnitSDbiaBOLELRwg2LAa/MYATK52Di1VI6E9MRVknzdWureV5n10GGQ7zwL3kwXE6pnExwD6gm54hP9LzDM2/tsnLAcP+fvWyu53LCtaRmLC/0kCnAi57gl2d0Hpnp0Zaj/hOyy6DFoVYzBERC7zeem47OZ+NOQ77zd7l+HLujVL2DmS03iZ/e+I89dJIPWFoZbV6d9JlcVXnSkX/jC97HeBYYmELLLZ/vLk6PKNQ1axYgS0/xyodi1XwVTFOYfdk69HGKUOWfQ4B4sj brook@vista
brook@vista:~$

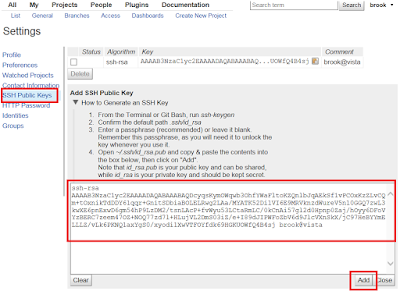
產生出來的Public Key就貼到Setting/SSH Public Keys中,如下圖


Create New Project

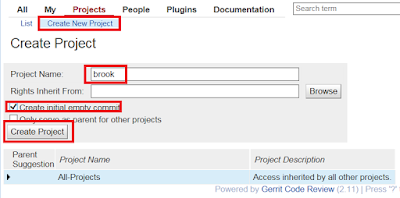
接下來就是建立一個新的Project,基本上只要點選Create New Project並填入名稱大致就完成了


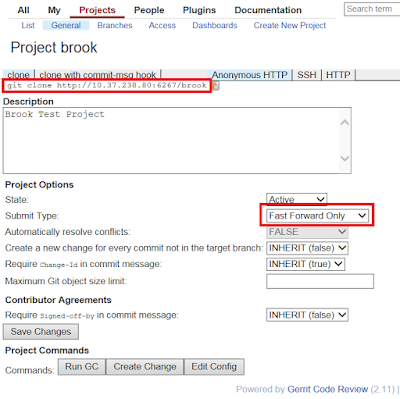
接著我將Project的Submit Type設定為FF,因為我不太喜歡有很多merge的log存在

Clone/Push/Pull Project

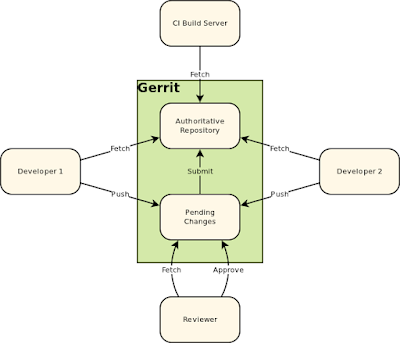
基本上跟一般git操作沒兩樣,差在gerrit每個commit需要change-id,必須push到refs/for/branch_name等待review,這觀念可以參考下圖
brook@vista:~$ git clone ssh://brook@vista:29418/brook
Cloning into 'brook'...
The authenticity of host '[1.3.2.8]:29418 ([1.3.2.8]:29418)' can't be established.
RSA key fingerprint is cc:29:ae:12:64:ff:e0:19:9b:d1:e4:61:b1:63:4c:51.
Are you sure you want to continue connecting (yes/no)? yes
Warning: Permanently added '[1.3.2.8]:29418' (RSA) to the list of known hosts.
remote: Counting objects: 2, done
remote: Finding sources: 100% (2/2)
remote: Total 2 (delta 0), reused 0 (delta 0)
Receiving objects: 100% (2/2), done.
brook@vista:~$ cd brook/
brook@vista:~/brook$ git remote -v
origin  ssh://brook@1.3.2.8:29418/brook (fetch)
origin  ssh://brook@1.3.2.8:29418/brook (push)
brook@vista:~/brook$ git branch -a
* master
  remotes/origin/HEAD -> origin/master
  remotes/origin/master
brook@vista:~/brook$ git log --stat
commit 79b2500f123690b50df8fa4e5fe9d4bf4459f4d9
Author: Brook Kuo <rene3210@gmail.com.tw>
Date:   Sat May 16 10:23:50 2015 +0800

    Initial empty repository
brook@vista:~/brook$ echo brook > myfile.txt
brook@vista:~/brook$ git add -f myfile.txt
brook@vista:~/brook$ git commit -m "brook 1st commit"
[master 7764665] brook 1st commit
 1 file changed, 1 insertion(+)
 create mode 100644 myfile.txt
brook@vista:~/brook$ git push origin HEAD:refs/for/master
Counting objects: 4, done.
Writing objects: 100% (3/3), 251 bytes, done.
Total 3 (delta 0), reused 0 (delta 0)
remote: Processing changes: refs: 1, done
remote: ERROR: missing Change-Id in commit message footer
remote:
remote: Hint: To automatically insert Change-Id, install the hook:
remote:   gitdir=$(git rev-parse --git-dir); scp -p -P 29418 brook@1.3.2.8:hooks/commit-msg ${gitdir}/hooks/
remote: And then amend the commit:
remote:   git commit --amend
remote:
To ssh://brook@1.3.2.8:29418/brook
 ! [remote rejected] HEAD -> refs/for/master (missing Change-Id in commit message footer)
error: failed to push some refs to 'ssh://brook@1.3.2.8:29418/brook'
brook@vista:~/brook$ gitdir=$(git rev-parse --git-dir); scp -p -P 29418 brook@1.3.2.8:hooks/commit-msg ${gitdir}/hooks/
commit-msg                                                                                 100% 4360     4.3KB/s   00:00
brook@vista:~/brook$ git commit --amend -m "brook 1st commit"
[master 994ca11] brook 1st commit
 1 file changed, 1 insertion(+)
 create mode 100644 myfile.txt
brook@vista:~/brook$ git log -1
commit 994ca118b141529f8b9ce4269a896c35b8730508
Author: Brook Kuo <rene3210@gmail.com.tw>
Date:   Sat May 16 11:09:11 2015 +0800

    brook 1st commit

    Change-Id: I9084cc25762e052527af98a335efb890c5ea3e89
brook@vista:~/brook$ git push origin HEAD:refs/for/master
Counting objects: 4, done.
Writing objects: 100% (3/3), 291 bytes, done.
Total 3 (delta 0), reused 0 (delta 0)
remote: Processing changes: new: 1, refs: 1, done
remote:
remote: New Changes:
remote:   http://1.3.2.8:6267/1 brook 1st commit
remote:
To ssh://brook@1.3.2.8:29418/brook
 * [new branch]      HEAD -> refs/for/master


圖來自https://review.openstack.org/Documentation/images/intro-quick-central-gerrit.png


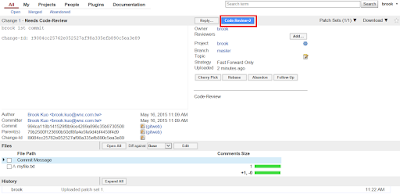
Review and Submit


基本上Gerrit就是個網頁review system,直接網頁點選就可以完成review/submit等動作
Open頁面顯示待review之commit


點選+2,只有+2才能被submit


點選Submit,code才能真正被merge到project中


Merge頁面顯示被merge的commit


Install Simpleid


為了安裝Gerrit,於是就順便安裝了SimpleID來玩玩,順手寫一下,衝點文章數,安慰一下自己。
SimpleID is a simple, personal OpenID provider written in PHP.

什麼是OpenID?
我喜歡用這張圖來解說

來源: http://konstantin.beznosov.net/professional/archives/241

終端使用者(User)
        想要向某個網站表明身份的人。
標識(Identifier)
        終端使用者用以標識其身份的URL或XRI。
身份提供者(Identity Provider, IdP)
        提供OpenID URL或XRI註冊和驗證服務的服務提供者。
依賴方(Relying Party, RP)
        想要對終端使用者的標識進行驗證的網站。

User想要登入網站RP,而RP會提供OpenID的認證方式,於是就會有一個表單讓User填入Openid Identifier,如圖中的ecc.ubc.ca/alice,於是RP就會跟IdP進行認證,於是User只要輸入IdP上面的帳號密碼,IdP會向RP回報認證結果。

安裝SimpleID非常簡單,sudo apt-get install simpleid即可安裝完畢,接著copy /usr/share/simpleid/sample/example.identity.dist到/var/lib/simpleid/identities底下,並且更名為brook.identity,一定要以identity當附檔名,前面則是user name,接著編輯pass="password"這行,密碼可以透過php指令去generate,指令如下
brook@vista:/var/lib/simpleid/identities# php -a
Interactive shell

php > print md5('example password') . "\n";
ea07017619350413c8a0d604cffdbe50
php >
php > exit
將著就可以登入simpleid了,請輸入http://127.0.0.1/simpleid,輸入user帳號與剛剛設定的密碼即可登入。


比如當你要登入gerrit時,OpenID欄位表單就可以輸入http://your.ip/simpleid/,就可以透過SimpleID做認證了。


    參考資料:
  1. SimpleID 1 Documentation - Identity files
  2. WIKI, OpenID


2015年5月2日 星期六

Sendmail之SMART_HOST設定


話說Sendmail是大學時候看過的東西,對它還真是越來越陌生。

Smart Host是一種email message transfer agent,簡單來說就是一台中繼的Mail Server,凡是User要送出的信,並不會直接送給收件者的Mail Server,而是先送到該中繼點,再由Smart Host送給收件者的Mail Server,如下圖所示。


透過 sendmail 的sendmail.mc 設定,讓外寄的信都轉送到該SMART HOST(我的SMART HOST是1.1.1.3),為了避免外寄來的信都轉給該主機的User,必須加上FEATURE(stickyhost)。
所以請將以下兩行加入/etc/mail/sendmail.mc 中,建議用copy and paste,避免符號寫錯。
...
FEATURE(stickyhost)
define(`SMART_HOST', `relay.dnsexit.com') 
...

接著執行更新
# m4 sendmail.mc > sendmail.cf
# /etc/init.d/sendmail restart


接著利用mail這個指令,與/var/log/mail.log進行check與deubg。
brook@vista:~$ mail --debug-line-info --debug-level=30 rene3210@gmail.com -s "brook"
Cc:
in
sendmail.c:112: sendmail (/usr/sbin/sendmailn
mu_auth.c:255: Getting auth info for UID 1000
mu_auth.c:195: Trying generic...
mu_auth.c:198: generic yields 38=Function not implemented
mu_auth.c:195: Trying system...
mu_auth.c:198: system yields 0=Success
mu_auth.c:206: source=system, name=brook, passwd=x, uid=1000, gid=1000, gecos=BROOK,,,, dir=/home/brook, shell=/bin/bash, mailbox=/var/mail/brook, quota=0, change_uid=1
mailer.c:454: mu_mailer_send_message(): using From: brook@vista
progmailer.c:188: Sending headers...
progmailer.c:221: Sending body...
progmailer.c:269: /usr/sbin/sendmail exited with: 0

brook@vista:~$ tail -f /var/log/mail.log
May  2 21:35:44 vista sendmail[383]: My unqualified host name (vista) unknown; sleeping for retry
May  2 21:36:44 vista sendmail[383]: unable to qualify my own domain name (vista) -- using short name
May  2 21:36:44 vista sendmail[383]: t42DaiZa000383: from=brook@vista, size=85, class=0, nrcpts=1, msgid=<201505021336.t42DaiZa000383@vista>, relay=brook@localhost
May  2 21:36:44 vista sm-mta[388]: t42DaiNp000388: from=<brook@vista>, size=364, class=0, nrcpts=1, msgid=<201505021336.t42DaiZa000383@vista>, proto=ESMTP, daemon=MTA-v4, relay=localhost [127.0.0.1]
May  2 21:36:44 vista sendmail[383]: t42DaiZa000383: to=<rene3210@gmail.com>, ctladdr=brook@vista (1000/1000), delay=00:00:00, xdelay=00:00:00, mailer=relay, pri=30085, relay=[127.0.0.1] [127.0.0.1], dsn=2.0.0, stat=Sent (t42DaiNp000388 Message accepted for delivery)
May  2 21:36:45 vista sm-mta[390]: t42DaiNp000388: to=<rene3210@gmail.com>, ctladdr=<brook@vista> (1000/1000), delay=00:00:01, xdelay=00:00:01, mailer=relay, pri=120364, relay=[1.1.1.3] [1.1.1.3], dsn=2.0.0, stat=Sent (<201505021336.t42DaiZa000383@vista> [InternalId=109168394] Queued mail for delivery)


關於FEATURE(stickyhost)的說明
Beginning with V8.7 sendmail, addresses with and without a host part that resolve to local delivery are handled in the same way. For example, user and user@local.host are both looked up with the User Database (userdb on page 942) and processed by the localaddr rule set 5 (The localaddr Rule Set 5 on page 700). This processing can result in those addresses being forwarded to other machines.

user               ← not sticky
user@local.host    ← sticky


如果該Smart Host想要開放給其他Mail Server做relay用,請在/etc/mail/access做設定,如我要開放給jpr-Version-M4610這台機器做relay用,設定畫面如下。
接著執行
# makemap -v hash /etc/mail/access.db < /etc/mail/access
# /etc/init.d/sendmail restart


    參考資料:
  1. SMART_HOST, http://www.codemud.net/~thinker/GinGin_CGI.py/show_id_doc/237
  2. https://www.dnsexit.com/support/mailrelay/sendmail.html


2015年5月1日 星期五

安裝Gerrit


Gerrit,是一種以GIT作為底層的code review system,它使用網頁介面,讓團隊進行review,決定是否能夠提交,退回或是繼續修改。
可以由此download, https://gerrit-releases.storage.googleapis.com/index.html

安裝步驟可以參考裡面的Documentation,

1. 先建立database

我是採用mysql,其他db的設定可以參考Gerrit的Document。
  CREATE USER 'gerrit2'@'localhost' IDENTIFIED BY 'secret';
  CREATE DATABASE reviewdb;
  GRANT ALL ON reviewdb.* TO 'gerrit2'@'localhost';
  FLUSH PRIVILEGES;


2. Initialize the Site

基本上gerrit2會跳出對話框,將問題的資訊填完就可以安奘成功了。
gerrit2@vista:~$ ls
examples.desktop  gerrit-2.11.war
gerrit2@vista:~$ java -jar gerrit-2.11.war init -d review_site
Using secure store: com.google.gerrit.server.securestore.DefaultSecureStore

*** Gerrit Code Review 2.11
***

Create '/home/gerrit2/review_site' [Y/n]?

*** Git Repositories
***

Location of Git repositories   [git]:

*** SQL Database
***

Database server type           [h2]: mysql

Gerrit Code Review is not shipped with MySQL Connector/J 5.1.21
**  This library is required for your configuration. **
Download and install it now [Y/n]?
Downloading http://repo2.maven.org/maven2/mysql/mysql-connector-java/5.1.21/mysql-connector-java-5.1.21.jar ... OK
Checksum mysql-connector-java-5.1.21.jar OK
Server hostname                [localhost]:
Server port                    [(mysql default)]:
Database name                  [reviewdb]:
Database username              [gerrit2]:
gerrit2's password             :
              confirm password :

*** Index
***

Type                           [LUCENE/?]:

*** User Authentication
***

Authentication method          [OPENID/?]:

*** Review Labels
***

Install Verified label         [y/N]?

*** Email Delivery
***

SMTP server hostname           [localhost]:
SMTP server port               [(default)]:
SMTP encryption                [NONE/?]:
SMTP username                  :

*** Container Process
***

Run as                         [gerrit2]:
Java runtime                   [/usr/lib/jvm/java-7-openjdk-amd64/jre]:
Copy gerrit-2.11.war to /home/gerrit2/review_site/bin/gerrit.war [Y/n]?
Copying gerrit-2.11.war to /home/gerrit2/review_site/bin/gerrit.war

*** SSH Daemon
***


Listen on address              [*]:
Listen on port                 [29418]:

Gerrit Code Review is not shipped with Bouncy Castle Crypto SSL v151
  If available, Gerrit can take advantage of features
  in the library, but will also function without it.
Download and install it now [Y/n]?
Downloading http://www.bouncycastle.org/download/bcpkix-jdk15on-151.jar ... OK
Checksum bcpkix-jdk15on-151.jar OK

Gerrit Code Review is not shipped with Bouncy Castle Crypto Provider v151
** This library is required by Bouncy Castle Crypto SSL v151. **
Download and install it now [Y/n]?
Downloading http://www.bouncycastle.org/download/bcprov-jdk15on-151.jar ... OK
Checksum bcprov-jdk15on-151.jar OK
Generating SSH host key ... rsa... dsa... done

*** HTTP Daemon
***

Behind reverse proxy           [y/N]?
Use SSL (https://)             [y/N]?
Listen on address              [*]:
Listen on port                 [8080]: 6267
Canonical URL                  [http://localhost:6267/]:

*** Plugins
***

Installing plugins.
Install plugin download-commands version v2.11 [y/N]?
Install plugin reviewnotes version v2.11 [y/N]?
Install plugin singleusergroup version v2.11 [y/N]?
Install plugin replication version v2.11 [y/N]?
Install plugin commit-message-length-validator version v2.11 [y/N]?
Initializing plugins.
No plugins found with init steps.

Execute now [Y/n]?
Initialized /home/gerrit2/review_site
Executing /home/gerrit2/review_site/bin/gerrit.sh start
Starting Gerrit Code Review: OK
Waiting for server on localhost:6267 ... OK


3. Start/Stop Daemon


可以透過review_site/bin/gerrit.sh將deamon進行開關,通常我會在rc5.d中建立link到該script中
review_site/bin/gerrit.sh start
review_site/bin/gerrit.sh stop
review_site/bin/gerrit.sh restart


4. Setup Administrator

可以用Web開啟gerrit並且設定第一個User,即Adminstrator。

基本上我是自己建立一個OpenID,你可以選擇其他認證方式。


參考資料: Gerrit Document


2015年4月19日 星期日

Table Of Content for tag "tools"


2015年2月27日 星期五

OpenEmbedded User Manual - CH3, Writing Meta Data (Adding packages)


如同User manual提的,讓我們從寫package的description跟license開始,我們寫一個brook_1.0.bb開始

description

DESCRIPTION = "Brook's first application"
HOMEPAGE = "http://www.brook.com/oe/"
LICENSE = "Brook-Proprietary"
基本上這些參數都只是描述,也就是字串,至於LICENSE有公用哪些選項,請參考Recipe License Fields

define dependency

DEPENDS = "gtk+"
RDEPENDS = "cool-ttf-fonts"
DEPENDS是build時需要哪個package,RDEPENDS則是執行時需要哪個package,也就是說如果該brook_1.0被加到image,則RDEPENDS所列的也都會被加到image之中。

source location

SRC_URI = "http://127.0.0.1/brook/${P}.tar.bz2"
SRC_URI[md5sum] = "6abf52e3f874f67bc4663d0986493970"
SRC_URI[sha256sum] = "7aa5130f9648f0948ebaad270a4fe1112e4cc06895580dab85da26baa37fd4f6"
SRC_URI是指定檔案所在的位置,可以支援http、ftp、git、svn、file等,詳情可參考SRC_URI variable,SRC_URI[md5sum]與SRC_URI[sha256sum]是去驗證檔案是否正確,可以透過md5sum file_name與sha256sum file_name算出。當中的${P}=${PN}-${PV},${PN}是Package Name,${PV}是Package Version。

build system selection

在開始真正build package之前,我們必須決定這個package使用哪個build system,如果這個package需要先執行configure script然後在make,那麼通常就會選用autotools,更多關於autotools class,其他inherit之後再來討論。

到此可以真正開始build brook這個package了,bitbake brook

完整brook_1.0.bb

DESCRIPTION = "Brook's first application"
HOMEPAGE = "http://www.brook.com/oe/"
LICENSE = "Brook-Proprietary"
LIC_FILES_CHKSUM = "file://COPYING;md5=dcb2a5c2b6d6fea1a0835c08d71ad817"

SRC_URI = "http://127.0.0.1/brook/${P}.tar.bz2"
SRC_URI[md5sum] = "6abf52e3f874f67bc4663d0986493970"
SRC_URI[sha256sum] = "7aa5130f9648f0948ebaad270a4fe1112e4cc06895580dab85da26baa37fd4f6"
inherit autotools


Example of Source Code

brook-1.0/Makefile
all: brook

brook: main.o
 ${CC} $? -o $@
install:
 install -d -m 755 ${DESTDIR}/bin
 install -m 755 brook ${DESTDIR}/bin


brook-1.0/main.c
#include <stdio.h>

int main(int argc, char *argv[])
{
    printf("Hello world, Brook\n");
    return 0;
}


    參考資料:
  1. OpenEmbedded User Manual
  2. OpenEmbedded - Style Guide
  3. OpenEmbedded - Recipe License Fields


LIC_FILES_CHKSUM does not match

如果出現以下錯誤
ERROR: brook: Recipe file does not have license file information (LIC_FILES_CHKSUM)
ERROR: Licensing Error: LIC_FILES_CHKSUM does not match, please fix
可以在bb file中加入
LIC_FILES_CHKSUM = "file://COPYING;md5=dcb2a5c2b6d6fea1a0835c08d71ad817"

其中COPYING就是LICENSE檔案位置,我是指到source file解開後的COPYING檔案位置與其對應的md5sum。


2015年2月7日 星期六

nc — arbitrary TCP and UDP connections and listens


幾乎任何使用 TCP,UDP或UNIX-domain socket的動作都可以用nc來達成,常見的功能如。
  • simple TCP proxies
  • shell-script based HTTP clients and servers
  • network daemon testing
  • a SOCKS or HTTP ProxyCommand for ssh(1)
  • and much, much more


SYNOPSIS
     nc [-46bCDdhklnrStUuvZz] [-I length] [-i interval] [-O length]
        [-P proxy_username] [-p source_port]
        [-q seconds] [-s source] [-T toskeyword] [-V rtable]
        [-w timeout] [-X proxy_protocol] [-x proxy_address[:port]]
        [destination] [port]


options: -v, verbose

不加-v,發生錯誤時不會有訊息。
brook@vista:~$ nc 127.0.0.1 12345
brook@vista:~$ nc -v 127.0.0.1 12345
nc: connect to 127.0.0.1 port 12345 (tcp) failed: Connection refused
brook@vista:~$ nc -v 127.0.0.1 80
Connection to 127.0.0.1 80 port [tcp/http] succeeded!
輸入GET / HTTP/1.1
輸入HOST: 127.0.0.1
輸入[enter]
輸入[enter]

HTTP/1.1 200 OK
Date: Tue, 27 Jan 2015 08:24:17 GMT
Server: Apache/2.2.22 (Ubuntu)
Last-Modified: Mon, 23 Dec 2013 04:13:45 GMT
ETag: "1b806ff-b1-4ee2bdaa24ac8"
Accept-Ranges: bytes
Content-Length: 177
Vary: Accept-Encoding
Content-Type: text/html
X-Pad: avoid browser bug

<html><body><h1>It works!</h1>
<p>This is the default web page for this server.</p>
<p>The web server software is running but no content has been added, yet.</p>
</body></html>


options: -l, listen for an incoming connection rather than initiate a connection to a remote host

等同開socket在listen,預設是tcp。
brook@vista:~$ nc -l 127.0.0.1 5000 -> server
brook@vista:~$ netstat -nal | grep 5000
tcp        0      0 127.0.0.1:5000          0.0.0.0:*               LISTEN
brook@vista:~$ nc 127.0.0.1 5000 -> client


options: -u, Use UDP instead of the default option of TCP.

使用UDP取代預設的TCP
brook@vista:~$ nc -lu 127.0.0.1 5000 -> server
brook@vista:~$ nc -u 127.0.0.1 5000 -> client


使用nc當Web Server

{ echo -ne "HTTP/1.0 200 OK\r\nContent-Length: $(wc -c < some.file)\r\n\r\n"; cat some.file; } | nc -l 5050
開啟Browser,http://127.0.0.1:5050/,就可以看到網頁了。

Works as a Port Scanner

brook@vista:~$ nc -v -z 127.0.0.1 80-200 2>&1 | grep -v failed
Connection to 127.0.0.1 80 port [tcp/http] succeeded!
Connection to 127.0.0.1 139 port [tcp/netbios-ssn] succeeded!


Transfering Files

sender
brook@vista:~$ md5sum usb_eth.txt
2367562f85f99fe972b9d6a83ce38099  usb_eth.txt
brook@vista:~$ tar cvf - usb_eth.txt | nc 127.0.0.1 5000
usb_eth.txt

receiver
brook@vista:/tmp$ nc -l 5000 | tar xvf -
usb_eth.txt
brook@vista:/tmp$ md5sum usb_eth.txt
2367562f85f99fe972b9d6a83ce38099  usb_eth.txt


Git Proxy

以下的Script是我拿用當gitproxy用的
#!/bin/bash
# http://tech-tacolin.blogspot.tw/2013/04/git-http-proxy.html
PROXY=1.2.3.4
PROXYPORT=3128
case $1 in
    192.168.1.1 | internal-ip)
        nc -X connect $*
        ;;
    *)
        nc -x $PROXY:$PROXYPORT -X connect $*
        ;;
esac


    參考資料
  1. Netcat WIKI
  2. Netcat(Linux nc 指令)網路管理者工具實用範例


熱門文章