2015年5月10日 星期日

Gerrit How-to


先建立SSH Key

利用ssh-keygen產生ssh key,為了方便,我的passphrase是空白,這樣git操作時就不用問密碼了
brook@vista:~$ ssh-keygen
Generating public/private rsa key pair.
Enter file in which to save the key (/home/brook/.ssh/id_rsa):
Enter passphrase (empty for no passphrase):
Enter same passphrase again:
Your identification has been saved in /home/brook/.ssh/id_ras.
Your public key has been saved in /home/brook/.ssh/id_ras.pub.
The key fingerprint is:
be:5a:86:da:2f:9f:b1:fb:97:f1:bc:bd:30:ba:2a:56 brook@vista
The key's randomart image is:
+--[ RSA 2048]----+
|                 |
|                 |
|                 |
|                 |
|        S        |
|       o E  .    |
|      . *    B   |
|     o.= =  + =. |
|    . +=O+o+. .oo|
+-----------------+
brook@vista:~$ cat /home/brook/.ssh/id_ras.pub
ssh-rsa AAAAB3NzaC1yc2EAAAADAQABAAABAQDcyqsKymOWqwb3OhfYWaFltoKZQnlbJqAEkSf1vPCOxKzZLvCQm+tOxnikTdDDY61qqr+GnitSDbiaBOLELRwg2LAa/MYATK52Di1VI6E9MRVknzdWureV5n10GGQ7zwL3kwXE6pnExwD6gm54hP9LzDM2/tsnLAcP+fvWyu53LCtaRmLC/0kCnAi57gl2d0Hpnp0Zaj/hOyy6DFoVYzBERC7zeem47OZ+NOQ77zd7l+HLujVL2DmS03iZ/e+I89dJIPWFoZbV6d9JlcVXnSkX/jC97HeBYYmELLLZ/vLk6PKNQ1axYgS0/xyodi1XwVTFOYfdk69HGKUOWfQ4B4sj brook@vista
brook@vista:~$

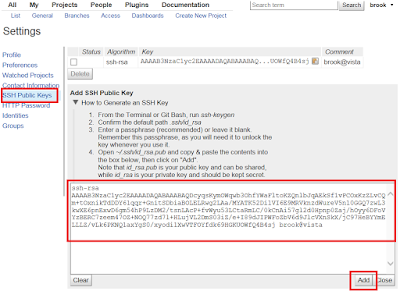
產生出來的Public Key就貼到Setting/SSH Public Keys中,如下圖


Create New Project

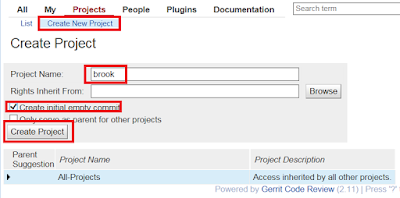
接下來就是建立一個新的Project,基本上只要點選Create New Project並填入名稱大致就完成了

接著我將Project的Submit Type設定為FF,因為我不太喜歡有很多merge的log存在
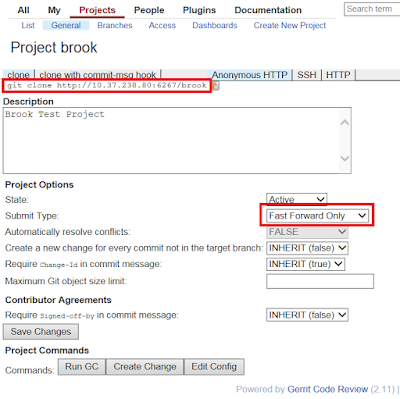
Clone/Push/Pull Project

基本上跟一般git操作沒兩樣,差在gerrit每個commit需要change-id,必須push到refs/for/branch_name等待review,這觀念可以參考下圖
brook@vista:~$ git clone ssh://brook@vista:29418/brook
Cloning into 'brook'...
The authenticity of host '[1.3.2.8]:29418 ([1.3.2.8]:29418)' can't be established.
RSA key fingerprint is cc:29:ae:12:64:ff:e0:19:9b:d1:e4:61:b1:63:4c:51.
Are you sure you want to continue connecting (yes/no)? yes
Warning: Permanently added '[1.3.2.8]:29418' (RSA) to the list of known hosts.
remote: Counting objects: 2, done
remote: Finding sources: 100% (2/2)
remote: Total 2 (delta 0), reused 0 (delta 0)
Receiving objects: 100% (2/2), done.
brook@vista:~$ cd brook/
brook@vista:~/brook$ git remote -v
origin  ssh://brook@1.3.2.8:29418/brook (fetch)
origin  ssh://brook@1.3.2.8:29418/brook (push)
brook@vista:~/brook$ git branch -a
* master
  remotes/origin/HEAD -> origin/master
  remotes/origin/master
brook@vista:~/brook$ git log --stat
commit 79b2500f123690b50df8fa4e5fe9d4bf4459f4d9
Author: Brook Kuo <rene3210@gmail.com.tw>
Date:   Sat May 16 10:23:50 2015 +0800

    Initial empty repository
brook@vista:~/brook$ echo brook > myfile.txt
brook@vista:~/brook$ git add -f myfile.txt
brook@vista:~/brook$ git commit -m "brook 1st commit"
[master 7764665] brook 1st commit
 1 file changed, 1 insertion(+)
 create mode 100644 myfile.txt
brook@vista:~/brook$ git push origin HEAD:refs/for/master
Counting objects: 4, done.
Writing objects: 100% (3/3), 251 bytes, done.
Total 3 (delta 0), reused 0 (delta 0)
remote: Processing changes: refs: 1, done
remote: ERROR: missing Change-Id in commit message footer
remote:
remote: Hint: To automatically insert Change-Id, install the hook:
remote:   gitdir=$(git rev-parse --git-dir); scp -p -P 29418 brook@1.3.2.8:hooks/commit-msg ${gitdir}/hooks/
remote: And then amend the commit:
remote:   git commit --amend
remote:
To ssh://brook@1.3.2.8:29418/brook
 ! [remote rejected] HEAD -> refs/for/master (missing Change-Id in commit message footer)
error: failed to push some refs to 'ssh://brook@1.3.2.8:29418/brook'
brook@vista:~/brook$ gitdir=$(git rev-parse --git-dir); scp -p -P 29418 brook@1.3.2.8:hooks/commit-msg ${gitdir}/hooks/
commit-msg                                                                                 100% 4360     4.3KB/s   00:00
brook@vista:~/brook$ git commit --amend -m "brook 1st commit"
[master 994ca11] brook 1st commit
 1 file changed, 1 insertion(+)
 create mode 100644 myfile.txt
brook@vista:~/brook$ git log -1
commit 994ca118b141529f8b9ce4269a896c35b8730508
Author: Brook Kuo <rene3210@gmail.com.tw>
Date:   Sat May 16 11:09:11 2015 +0800

    brook 1st commit

    Change-Id: I9084cc25762e052527af98a335efb890c5ea3e89
brook@vista:~/brook$ git push origin HEAD:refs/for/master
Counting objects: 4, done.
Writing objects: 100% (3/3), 291 bytes, done.
Total 3 (delta 0), reused 0 (delta 0)
remote: Processing changes: new: 1, refs: 1, done
remote:
remote: New Changes:
remote:   http://1.3.2.8:6267/1 brook 1st commit
remote:
To ssh://brook@1.3.2.8:29418/brook
 * [new branch]      HEAD -> refs/for/master
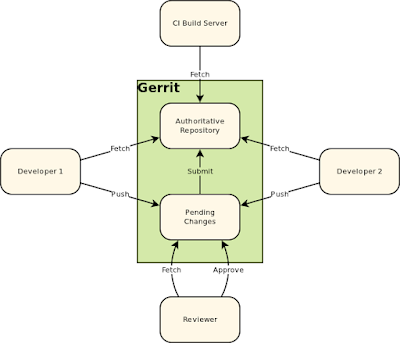

圖來自https://review.openstack.org/Documentation/images/intro-quick-central-gerrit.png


Review and Submit


基本上Gerrit就是個網頁review system,直接網頁點選就可以完成review/submit等動作
Open頁面顯示待review之commit


點選+2,只有+2才能被submit
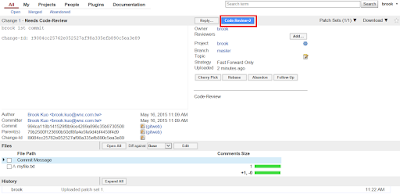

點選Submit,code才能真正被merge到project中


Merge頁面顯示被merge的commit


Install Simpleid


為了安裝Gerrit,於是就順便安裝了SimpleID來玩玩,順手寫一下,衝點文章數,安慰一下自己。
SimpleID is a simple, personal OpenID provider written in PHP.

什麼是OpenID?
我喜歡用這張圖來解說

來源: http://konstantin.beznosov.net/professional/archives/241

終端使用者(User)
        想要向某個網站表明身份的人。
標識(Identifier)
        終端使用者用以標識其身份的URL或XRI。
身份提供者(Identity Provider, IdP)
        提供OpenID URL或XRI註冊和驗證服務的服務提供者。
依賴方(Relying Party, RP)
        想要對終端使用者的標識進行驗證的網站。

User想要登入網站RP,而RP會提供OpenID的認證方式,於是就會有一個表單讓User填入Openid Identifier,如圖中的ecc.ubc.ca/alice,於是RP就會跟IdP進行認證,於是User只要輸入IdP上面的帳號密碼,IdP會向RP回報認證結果。

安裝SimpleID非常簡單,sudo apt-get install simpleid即可安裝完畢,接著copy /usr/share/simpleid/sample/example.identity.dist到/var/lib/simpleid/identities底下,並且更名為brook.identity,一定要以identity當附檔名,前面則是user name,接著編輯pass="password"這行,密碼可以透過php指令去generate,指令如下
brook@vista:/var/lib/simpleid/identities# php -a
Interactive shell

php > print md5('example password') . "\n";
ea07017619350413c8a0d604cffdbe50
php >
php > exit
將著就可以登入simpleid了,請輸入http://127.0.0.1/simpleid,輸入user帳號與剛剛設定的密碼即可登入。


比如當你要登入gerrit時,OpenID欄位表單就可以輸入http://your.ip/simpleid/,就可以透過SimpleID做認證了。


    參考資料:
  1. SimpleID 1 Documentation - Identity files
  2. WIKI, OpenID


2015年5月2日 星期六

Sendmail之SMART_HOST設定


話說Sendmail是大學時候看過的東西,對它還真是越來越陌生。

Smart Host是一種email message transfer agent,簡單來說就是一台中繼的Mail Server,凡是User要送出的信,並不會直接送給收件者的Mail Server,而是先送到該中繼點,再由Smart Host送給收件者的Mail Server,如下圖所示。


透過 sendmail 的sendmail.mc 設定,讓外寄的信都轉送到該SMART HOST(我的SMART HOST是1.1.1.3),為了避免外寄來的信都轉給該主機的User,必須加上FEATURE(stickyhost)。
所以請將以下兩行加入/etc/mail/sendmail.mc 中,建議用copy and paste,避免符號寫錯。
...
FEATURE(stickyhost)
define(`SMART_HOST', `relay.dnsexit.com') 
...

接著執行更新
# m4 sendmail.mc > sendmail.cf
# /etc/init.d/sendmail restart


接著利用mail這個指令,與/var/log/mail.log進行check與deubg。
brook@vista:~$ mail --debug-line-info --debug-level=30 rene3210@gmail.com -s "brook"
Cc:
in
sendmail.c:112: sendmail (/usr/sbin/sendmailn
mu_auth.c:255: Getting auth info for UID 1000
mu_auth.c:195: Trying generic...
mu_auth.c:198: generic yields 38=Function not implemented
mu_auth.c:195: Trying system...
mu_auth.c:198: system yields 0=Success
mu_auth.c:206: source=system, name=brook, passwd=x, uid=1000, gid=1000, gecos=BROOK,,,, dir=/home/brook, shell=/bin/bash, mailbox=/var/mail/brook, quota=0, change_uid=1
mailer.c:454: mu_mailer_send_message(): using From: brook@vista
progmailer.c:188: Sending headers...
progmailer.c:221: Sending body...
progmailer.c:269: /usr/sbin/sendmail exited with: 0

brook@vista:~$ tail -f /var/log/mail.log
May  2 21:35:44 vista sendmail[383]: My unqualified host name (vista) unknown; sleeping for retry
May  2 21:36:44 vista sendmail[383]: unable to qualify my own domain name (vista) -- using short name
May  2 21:36:44 vista sendmail[383]: t42DaiZa000383: from=brook@vista, size=85, class=0, nrcpts=1, msgid=<201505021336.t42DaiZa000383@vista>, relay=brook@localhost
May  2 21:36:44 vista sm-mta[388]: t42DaiNp000388: from=<brook@vista>, size=364, class=0, nrcpts=1, msgid=<201505021336.t42DaiZa000383@vista>, proto=ESMTP, daemon=MTA-v4, relay=localhost [127.0.0.1]
May  2 21:36:44 vista sendmail[383]: t42DaiZa000383: to=<rene3210@gmail.com>, ctladdr=brook@vista (1000/1000), delay=00:00:00, xdelay=00:00:00, mailer=relay, pri=30085, relay=[127.0.0.1] [127.0.0.1], dsn=2.0.0, stat=Sent (t42DaiNp000388 Message accepted for delivery)
May  2 21:36:45 vista sm-mta[390]: t42DaiNp000388: to=<rene3210@gmail.com>, ctladdr=<brook@vista> (1000/1000), delay=00:00:01, xdelay=00:00:01, mailer=relay, pri=120364, relay=[1.1.1.3] [1.1.1.3], dsn=2.0.0, stat=Sent (<201505021336.t42DaiZa000383@vista> [InternalId=109168394] Queued mail for delivery)


關於FEATURE(stickyhost)的說明
Beginning with V8.7 sendmail, addresses with and without a host part that resolve to local delivery are handled in the same way. For example, user and user@local.host are both looked up with the User Database (userdb on page 942) and processed by the localaddr rule set 5 (The localaddr Rule Set 5 on page 700). This processing can result in those addresses being forwarded to other machines.

user               ← not sticky
user@local.host    ← sticky


如果該Smart Host想要開放給其他Mail Server做relay用,請在/etc/mail/access做設定,如我要開放給jpr-Version-M4610這台機器做relay用,設定畫面如下。
接著執行
# makemap -v hash /etc/mail/access.db < /etc/mail/access
# /etc/init.d/sendmail restart


    參考資料:
  1. SMART_HOST, http://www.codemud.net/~thinker/GinGin_CGI.py/show_id_doc/237
  2. https://www.dnsexit.com/support/mailrelay/sendmail.html


2015年5月1日 星期五

安裝Gerrit


Gerrit,是一種以GIT作為底層的code review system,它使用網頁介面,讓團隊進行review,決定是否能夠提交,退回或是繼續修改。
可以由此download, https://gerrit-releases.storage.googleapis.com/index.html

安裝步驟可以參考裡面的Documentation,

1. 先建立database

我是採用mysql,其他db的設定可以參考Gerrit的Document。
  CREATE USER 'gerrit2'@'localhost' IDENTIFIED BY 'secret';
  CREATE DATABASE reviewdb;
  GRANT ALL ON reviewdb.* TO 'gerrit2'@'localhost';
  FLUSH PRIVILEGES;


2. Initialize the Site

基本上gerrit2會跳出對話框,將問題的資訊填完就可以安奘成功了。
gerrit2@vista:~$ ls
examples.desktop  gerrit-2.11.war
gerrit2@vista:~$ java -jar gerrit-2.11.war init -d review_site
Using secure store: com.google.gerrit.server.securestore.DefaultSecureStore

*** Gerrit Code Review 2.11
***

Create '/home/gerrit2/review_site' [Y/n]?

*** Git Repositories
***

Location of Git repositories   [git]:

*** SQL Database
***

Database server type           [h2]: mysql

Gerrit Code Review is not shipped with MySQL Connector/J 5.1.21
**  This library is required for your configuration. **
Download and install it now [Y/n]?
Downloading http://repo2.maven.org/maven2/mysql/mysql-connector-java/5.1.21/mysql-connector-java-5.1.21.jar ... OK
Checksum mysql-connector-java-5.1.21.jar OK
Server hostname                [localhost]:
Server port                    [(mysql default)]:
Database name                  [reviewdb]:
Database username              [gerrit2]:
gerrit2's password             :
              confirm password :

*** Index
***

Type                           [LUCENE/?]:

*** User Authentication
***

Authentication method          [OPENID/?]:

*** Review Labels
***

Install Verified label         [y/N]?

*** Email Delivery
***

SMTP server hostname           [localhost]:
SMTP server port               [(default)]:
SMTP encryption                [NONE/?]:
SMTP username                  :

*** Container Process
***

Run as                         [gerrit2]:
Java runtime                   [/usr/lib/jvm/java-7-openjdk-amd64/jre]:
Copy gerrit-2.11.war to /home/gerrit2/review_site/bin/gerrit.war [Y/n]?
Copying gerrit-2.11.war to /home/gerrit2/review_site/bin/gerrit.war

*** SSH Daemon
***


Listen on address              [*]:
Listen on port                 [29418]:

Gerrit Code Review is not shipped with Bouncy Castle Crypto SSL v151
  If available, Gerrit can take advantage of features
  in the library, but will also function without it.
Download and install it now [Y/n]?
Downloading http://www.bouncycastle.org/download/bcpkix-jdk15on-151.jar ... OK
Checksum bcpkix-jdk15on-151.jar OK

Gerrit Code Review is not shipped with Bouncy Castle Crypto Provider v151
** This library is required by Bouncy Castle Crypto SSL v151. **
Download and install it now [Y/n]?
Downloading http://www.bouncycastle.org/download/bcprov-jdk15on-151.jar ... OK
Checksum bcprov-jdk15on-151.jar OK
Generating SSH host key ... rsa... dsa... done

*** HTTP Daemon
***

Behind reverse proxy           [y/N]?
Use SSL (https://)             [y/N]?
Listen on address              [*]:
Listen on port                 [8080]: 6267
Canonical URL                  [http://localhost:6267/]:

*** Plugins
***

Installing plugins.
Install plugin download-commands version v2.11 [y/N]?
Install plugin reviewnotes version v2.11 [y/N]?
Install plugin singleusergroup version v2.11 [y/N]?
Install plugin replication version v2.11 [y/N]?
Install plugin commit-message-length-validator version v2.11 [y/N]?
Initializing plugins.
No plugins found with init steps.

Execute now [Y/n]?
Initialized /home/gerrit2/review_site
Executing /home/gerrit2/review_site/bin/gerrit.sh start
Starting Gerrit Code Review: OK
Waiting for server on localhost:6267 ... OK


3. Start/Stop Daemon


可以透過review_site/bin/gerrit.sh將deamon進行開關,通常我會在rc5.d中建立link到該script中
review_site/bin/gerrit.sh start
review_site/bin/gerrit.sh stop
review_site/bin/gerrit.sh restart


4. Setup Administrator

可以用Web開啟gerrit並且設定第一個User,即Adminstrator。

基本上我是自己建立一個OpenID,你可以選擇其他認證方式。


參考資料: Gerrit Document


熱門文章