顯示具有 Embedded 標籤的文章。 顯示所有文章

2024年7月5日 星期五

Configuration of a minimal systemd setup in QEMU


本文記錄如何在 QEMU 環境中設定最小的 systemd init。基本上需要建立兩個必要的目標:sysinit.target 和 basic.target,以及用於登入的 getty@.service。
SRCROOT=/opt/armv7vet2hf/sysroots/
DSTROOT=initrd
SRCLIB=$SRCROOT/lib
DSTLIB=$DSTROOT/lib
SRCSYSDLIB=$SRCROOT/lib/systemd
DSTSYSDLIB=$DSTROOT/lib/systemd
SRCUSRLIB=$SRCROOT/usr/lib
DSTUSRLIB=$DSTROOT/usr/lib

rm -rf $DSTROOT
mkdir -p $DSTROOT/bin $DSTROOT/usr/lib $DSTROOT/lib/systemd/system $DSTROOT/etc/systemd/system

# copy libraries
cp -a $SRCLIB/libselinux.so* $DSTLIB
cp -a $SRCLIB/libmount.so* $DSTLIB
cp -a $SRCLIB/libaudit.so* $DSTLIB
cp -a $SRCLIB/libc.so* $DSTLIB
cp -a $SRCLIB/ld-linux-armhf.so* $DSTLIB
cp -a $SRCLIB/libblkid.so* $DSTLIB
cp -a $SRCLIB/libcap.so* $DSTLIB
cp -a $SRCLIB/libm.so* $DSTLIB
cp -a $SRCLIB/libpcre.so* $DSTLIB
cp -a $SRCLIB/libcap-ng.so* $DSTLIB

cp -a $SRCUSRLIB/libacl.so* $DSTUSRLIB
cp -a $SRCUSRLIB/libcrypt.so* $DSTUSRLIB
cp -a $SRCUSRLIB/liblzma.so* $DSTUSRLIB
cp -a $SRCUSRLIB/libattr.so* $DSTUSRLIB

cp -a $SRCSYSDLIB/systemd $DSTSYSDLIB
cp -a $SRCSYSDLIB/libsystemd-shared* $DSTSYSDLIB
install -m 555 busybox-build/busybox $DSTROOT/bin/


# Create basic.target
cat << EOF > $DSTSYSDLIB/system/basic.target
[Unit]
Description=Basic System
EOF

# Create sysinit.target
cat << EOF > $DSTSYSDLIB/system/sysinit.target
[Unit]
Description=System Initialization
DefaultDependencies=no
EOF

# Create getty@tty1.service
cat << EOF > $DSTSYSDLIB/system/getty@.service
[Unit]
Description=Getty on %I
ConditionPathExists=/dev/%I

[Service]
ExecStart=-/sbin/getty 115200 %I
Restart=always

[Install]
WantedBy=basic.target rescue.target
EOF


chmod 644 -R $DSTSYSDLIB/system/*

cat << EOF > $DSTROOT/init
#!/bin/busybox sh
## Mount essential filesystems
/bin/busybox mkdir -p /proc /sys /dev /home /run/systemd/journal /tmp /var /mnt /sbin /usr/bin /usr/sbin /etc/systemd/system/basic.target.wants /etc/systemd/system/rescue.target.wants /etc/systemd/system/default.target.wants
/bin/busybox --install -s
ln -sf /lib/systemd/systemd /sbin/init

## Set the path for BusyBox applets if using BusyBox
export PATH=/sbin:/bin:/usr/sbin:/usr/bin
mount -t proc none /proc
mount -t sysfs none /sys
mount -t devtmpfs none /dev
mkdir -p /dev/pts
mount -t devpts none /dev/pts
## Ensure the getty@ttyAMA0.service file is linked in the correct place
ln -sf /lib/systemd/system/getty@.service /etc/systemd/system/basic.target.wants/getty@ttyAMA0.service
# create default password
echo "root:vnpTT1BZdW1/s:0:0:root:/root:/bin/sh" > /etc/passwd
echo "root:x:0:" > /etc/group

# Ensure systemd can find its units
ln -sf /lib/systemd/system/basic.target /lib/systemd/system/default.target

# Start systemd
exec /sbin/init
EOF
chmod +x $DSTROOT/init

fakeroot bash -c "cd linux && ./usr/gen_initramfs.sh ../$DSTROOT -o ../initrd-arm.img"


2022年4月2日 星期六

run Cortex-A57 with kernel 5.4 on qemu


這篇文章只是拿來記錄compile Kernel for Cortex-A57, 用於研究PCIe Driver, 其餘的rootfs與busybox請參考附錄
[brook@:~/Projects/qemu/linux-virt]$ sudo apt-get install gcc-aarch64-linux-gnu #for ARM64
[brook@:~/Projects/qemu/linux-virt]$ export ARCH=arm64
[brook@:~/Projects/qemu/linux-virt]$ export CROSS_COMPILE=aarch64-linux-gnu-
[brook@:~/Projects/qemu/linux-virt]$ cp arch/arm64/configs/defconfig .config
[brook@:~/Projects/qemu/linux-virt]$ make olddefconfig
  HOSTCC  scripts/basic/fixdep
  HOSTCC  scripts/kconfig/conf.o
  HOSTCC  scripts/kconfig/confdata.o
  HOSTCC  scripts/kconfig/expr.o
  LEX     scripts/kconfig/lexer.lex.c
  YACC    scripts/kconfig/parser.tab.[ch]
  HOSTCC  scripts/kconfig/lexer.lex.o
  HOSTCC  scripts/kconfig/parser.tab.o
  HOSTCC  scripts/kconfig/preprocess.o
  HOSTCC  scripts/kconfig/symbol.o
  HOSTLD  scripts/kconfig/conf
scripts/kconfig/conf  --olddefconfig Kconfig
#
# configuration written to .config
#
[brook@:~/Projects/qemu/linux-virt]$ make -j16
[brook@:~/Projects/qemu/linux-virt]$ qemu-system-aarch64 -machine virt -cpu cortex-a57 -smp 8 -m 4096 -kernel  ./arch/arm64/boot/Image -append "console=ttyAMA0 root=/dev/vda" -nographic -initrd ../initrd-arm.img
[    0.000000] Booting Linux on physical CPU 0x0000000000 [0x411fd070]
...
Please press Enter to activate this console.
/ #
/ # lspci -k
00:01.0 Class 0200: 1af4:1000 virtio-pci
00:00.0 Class 0600: 1b36:0008
/ # uname -r
5.4.0
1af4:1000是Virtio network device, 而1b36:0008是QEMU PCIe Host bridge
ETH PCIe driver在"drivers/virtio/virtio_pci_common.c", 其vendor ID是0x1af4, 當device插入時, 就會去比對ID, match後就會載入該module並probe
/* Qumranet donated their vendor ID for devices 0x1000 thru 0x10FF. */
static const struct pci_device_id virtio_pci_id_table[] = {
        { PCI_DEVICE(PCI_VENDOR_ID_REDHAT_QUMRANET, PCI_ANY_ID) },
        { 0 }
};

MODULE_DEVICE_TABLE(pci, virtio_pci_id_table);
...
static struct pci_driver virtio_pci_driver = {
        .name           = "virtio-pci",
        .id_table       = virtio_pci_id_table,
        .probe          = virtio_pci_probe,
        .remove         = virtio_pci_remove,
#ifdef CONFIG_PM_SLEEP
        .driver.pm      = &virtio_pci_pm_ops,
#endif
        .sriov_configure = virtio_pci_sriov_configure,
};

module_pci_driver(virtio_pci_driver);

這裡我把PCI ID移成PCI_DEVICE(PCI_VENDOR_ID_REDHAT_QUMRANET + 1, 再透過echo <vendor_code> <device_code> > /sys/bus/pci/drivers/<pci_device_driver>/new_id動態對PCIe driver新增ID, 讓系統認到網卡
[brook@:~/Projects/qemu/linux-virt]$ git diff .
diff --git a/drivers/virtio/virtio_pci_common.c b/drivers/virtio/virtio_pci_common.c
index f2862f66c2ac..60aef3fea650 100644
--- a/drivers/virtio/virtio_pci_common.c
+++ b/drivers/virtio/virtio_pci_common.c
@@ -492,7 +492,7 @@ static const struct dev_pm_ops virtio_pci_pm_ops = {

 /* Qumranet donated their vendor ID for devices 0x1000 thru 0x10FF. */
 static const struct pci_device_id virtio_pci_id_table[] = {
-       { PCI_DEVICE(PCI_VENDOR_ID_REDHAT_QUMRANET, PCI_ANY_ID) },
+       { PCI_DEVICE(PCI_VENDOR_ID_REDHAT_QUMRANET + 1, PCI_ANY_ID) },
        { 0 }
 };

@@ -514,6 +514,7 @@ static int virtio_pci_probe(struct pci_dev *pci_dev,
 {
        struct virtio_pci_device *vp_dev, *reg_dev = NULL;
        int rc;
+       printk("%s(#%d): Brook\n", __FUNCTION__, __LINE__);

        /* allocate our structure and fill it out */
        vp_dev = kzalloc(sizeof(struct virtio_pci_device), GFP_KERNEL);
lspci會認到1af4:1000, 但是eth driver因為被我跳號, 所以認不到, 再透過/sys/bus/pci/drivers/<pci_device_driver>/new_id將往卡帶起來
/ # lspci
00:01.0 Class 0200: 1af4:1000
00:00.0 Class 0600: 1b36:0008
/ # ifconfig -a
lo        Link encap:Local Loopback
          LOOPBACK  MTU:65536  Metric:1
          RX packets:0 errors:0 dropped:0 overruns:0 frame:0
          TX packets:0 errors:0 dropped:0 overruns:0 carrier:0
          collisions:0 txqueuelen:1000
          RX bytes:0 (0.0 B)  TX bytes:0 (0.0 B)
/ # echo 1af4 1000 > /sys/bus/pci/drivers/virtio-pci/new_id
[  130.728345] virtio_pci_probe(#517): Brook
[  130.729216] virtio-pci 0000:00:01.0: enabling device (0000 -> 0003)
/ # ifconfig -a
eth0      Link encap:Ethernet  HWaddr 52:54:00:12:34:56
          BROADCAST MULTICAST  MTU:1500  Metric:1
          RX packets:0 errors:0 dropped:0 overruns:0 frame:0
          TX packets:0 errors:0 dropped:0 overruns:0 carrier:0
          collisions:0 txqueuelen:1000
          RX bytes:0 (0.0 B)  TX bytes:0 (0.0 B)

lo        Link encap:Local Loopback
          LOOPBACK  MTU:65536  Metric:1
          RX packets:0 errors:0 dropped:0 overruns:0 frame:0
          TX packets:0 errors:0 dropped:0 overruns:0 carrier:0
          collisions:0 txqueuelen:1000
          RX bytes:0 (0.0 B)  TX bytes:0 (0.0 B)

透過echo <Domain:Bus:Device.Function> > /sys/bus/pci/drivers/<pci_device_driver>/unbind將driver移除, 也可以透過echo <Domain:Bus:Device.Function> > /sys/bus/pci/drivers/<pci_device_driver>/bind重新將driver帶上
/ # lspci
00:01.0 Class 0200: 1af4:1000
00:00.0 Class 0600: 1b36:0008
/ # echo 0000:00:01.0 > /sys/bus/pci/drivers/virtio-pci/unbind
[ 5163.097254] hrtimer: interrupt took 87350512 ns
/ # ifconfig -a
lo        Link encap:Local Loopback
          LOOPBACK  MTU:65536  Metric:1
          RX packets:0 errors:0 dropped:0 overruns:0 frame:0
          TX packets:0 errors:0 dropped:0 overruns:0 carrier:0
          collisions:0 txqueuelen:1000
          RX bytes:0 (0.0 B)  TX bytes:0 (0.0 B)

/ # echo 0000:00:01.0 > /sys/bus/pci/drivers/virtio-pci/bind
[ 5183.251580] virtio_pci_probe(#517): Brook
/ # ifconfig -a
eth0      Link encap:Ethernet  HWaddr 52:54:00:12:34:56
          BROADCAST MULTICAST  MTU:1500  Metric:1
          RX packets:0 errors:0 dropped:0 overruns:0 frame:0
          TX packets:0 errors:0 dropped:0 overruns:0 carrier:0
          collisions:0 txqueuelen:1000
          RX bytes:0 (0.0 B)  TX bytes:0 (0.0 B)

lo        Link encap:Local Loopback
          LOOPBACK  MTU:65536  Metric:1
          RX packets:0 errors:0 dropped:0 overruns:0 frame:0
          TX packets:0 errors:0 dropped:0 overruns:0 carrier:0
          collisions:0 txqueuelen:1000
          RX bytes:0 (0.0 B)  TX bytes:0 (0.0 B)


    參考資料:
  • https://blog.csdn.net/zhqh100/article/details/51173275, qemu模拟Cortex-A57运行Linux4.5.1
  • Build the Linux Kernel and Busybox for ARM and run them on QEMU
  • https://zhuanlan.zhihu.com/p/113467453, qemu PCIe总线结构
  • https://pci-ids.ucw.cz/read/PC/1af4, The PCI ID Repository
  • https://stackoverflow.com/questions/22901282/hard-time-in-understanding-module-device-tableusb-id-table-usage, Hard time in understanding MODULE_DEVICE_TABLE(usb, id_table) usage


2020年2月9日 星期日

busybox init flow


Linux在啟動kernel後,便由kernel載入init程式,由init程式完成餘下的啟動過程,簡略片段如下
Kernel 4.14
start_kernel()
  |--> rest_init()
    |--> pid = kernel_thread(kernel_init, NULL, CLONE_FS);
      |--> kernel_init()
       if (!try_to_run_init_process("/sbin/init") ||
          !try_to_run_init_process("/etc/init") ||
          !try_to_run_init_process("/bin/init") ||
          !try_to_run_init_process("/bin/sh"))
          return 0;
       panic("No working init found.  Try passing init= option to kernel. "
            "See Linux Documentation/admin-guide/init.rst for guidance.");

接著就會交由init開始一連串的init過程,busybox的init會去讀取/etc/inittab設定來進行init,如果沒有/etc/inittab,會執行以下預設的inittab內容
::sysinit:/etc/init.d/rcS
::askfirst:/bin/sh
::ctrlaltdel:/sbin/reboot
::shutdown:/sbin/swapoff -a
::shutdown:/bin/umount -a -r
::restart:/sbin/init
tty2::askfirst:/bin/sh
tty3::askfirst:/bin/sh
tty4::askfirst:/bin/sh

其格式為<id>:<runlevels>:<action>:<process>,說明如下
<id>: 與傳統init意思不同, 會把stdin/stdout設為/dev/<id>

<runlevels>: busybox會ignore該欄位

<action>: 有效的action包含sysinit, wait, once, respawn, askfirst, shutdown, restart and ctrlaltdel.
  "sysinit" 第一個被執行的action, init會等待"sysinit"執行完成後, 再執行wait與once
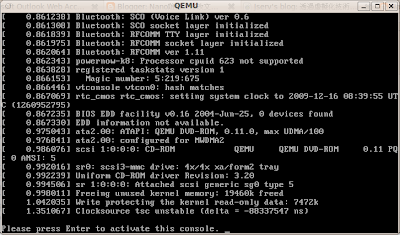
  "askfirst"/"respawn" 接著被執行, 但是askfirst執行前會先印"Please press Enter to activate this console". 

<process>: 要執行的命令

inittab的action執行code flow如下
# busybox v1.32

static pid_t run(const struct init_action *a)
{
  ...
  if (BB_MMU && (a->action_type & ASKFIRST)) {
    static const char press_enter[] ALIGN1 =
#ifdef CUSTOMIZED_BANNER
#include CUSTOMIZED_BANNER
#endif
        "\nPlease press Enter to activate this console. ";
    full_write(STDOUT_FILENO, press_enter, sizeof(press_enter) - 1);
    ...
  }
  ...
}

static void run_actions(int action_type)
{
  struct init_action *a;

  for (a = G.init_action_list; a; a = a->next) {
    if (!(a->action_type & action_type))
      continue;

    if (a->action_type & (SYSINIT | WAIT | ONCE | CTRLALTDEL | SHUTDOWN)) {
        pid_t pid = run(a);
      if (a->action_type & (SYSINIT | WAIT | CTRLALTDEL | SHUTDOWN))
          waitfor(pid);
    }
    if (a->action_type & (RESPAWN | ASKFIRST)) {
      /* Only run stuff with pid == 0. If pid != 0,
       * it is already running
       */
      if (a->pid == 0)
        a->pid = run(a);
    }
  }
}

int init_main(int argc UNUSED_PARAM, char **argv)
{
  ...
  /* Check if we are supposed to be in single user mode */
  if (argv[1]
   && (strcmp(argv[1], "single") == 0 || strcmp(argv[1], "-s") == 0 || LONE_CHAR(argv[1], '1'))
  ) {
    /* ??? shouldn't we set RUNLEVEL="b" here? */
    /* Start a shell on console */
    new_init_action(RESPAWN, bb_default_login_shell, "");
  } else {
    /* Not in single user mode - see what inittab says */

    /* NOTE that if CONFIG_FEATURE_USE_INITTAB is NOT defined,
    * then parse_inittab() simply adds in some default
    * actions (i.e., INIT_SCRIPT and a pair
    * of "askfirst" shells) */
    parse_inittab();
  }

  ...
  /* Now run everything that needs to be run */
  /* First run the sysinit command */
  run_actions(SYSINIT);
  check_delayed_sigs(&G.zero_ts);
  /* Next run anything that wants to block */
  run_actions(WAIT);
  check_delayed_sigs(&G.zero_ts);
  /* Next run anything to be run only once */
  run_actions(ONCE);
  ...
  while (1) {
    ...
    /* (Re)run the respawn/askfirst stuff */
    run_actions(RESPAWN | ASKFIRST);
    ...
  }
  ...
}


如果要進入signle user mode,就需要傳遞"single"或"-S"給init當參數,要把字串放在kernel parameters "--" 之後
The kernel parses parameters from the kernel command line up to “–”; 
if it doesn’t recognize a parameter and it doesn’t contain a ‘.’, 
the parameter gets passed to init: parameters with ‘=’ go into init’s environment, 
others are passed as command line arguments to init.
Everything after “–” is passed as an argument to init.

如:
qemu-system-arm -M vexpress-a9 -m 512M -kernel ./linux/arch/arm/boot/zImage -dtb \
./linux/arch/arm/boot/dts/vexpress-v2p-ca9.dtb -initrd ./initrd-arm.img \
-nographic -append "console=ttyAMA0 -- single"

busybox並不支援runlevel
    參考資料:
  • https://en.wikipedia.org/wiki/Init, init
  • https://en.wikipedia.org/wiki/Runlevel, runlevel
  • https://git.busybox.net/busybox/tree/examples/inittab, busybox example for inittab
  • https://www.itread01.com/p/1350587.html, kernel 啟動流程之 【裝置驅動載入】 學習筆記
  • https://www.itread01.com/content/1543246633.html, busybox(一)淺析

2019年6月23日 星期日

Build the Linux Kernel and Busybox for ARM and run them on QEMU


安裝corss-compiler
brook@vista:~/qemu$ wget http://releases.linaro.org/components/toolchain/binaries/7.4-2019.02/arm-linux-gnueabihf/gcc-linaro-7.4.1-2019.02-x86_64_arm-linux-gnueabihf.tar.xz 
brook@vista:~/qemu$ tar xvf gcc-linaro-7.4.1-2019.02-x86_64_arm-linux-gnueabihf.tar.xz
brook@vista:~/qemu$ sudo mv gcc-linaro-7.4.1-2019.02-x86_64_arm-linux-gnueabihf /opt/

編譯kernel
brook@vista:~/qemu$ cd linux-arm
brook@vista:~/qemu/linux-arm$ export ARCH=arm
brook@vista:~/qemu/linux-arm$ export CROSS_COMPILE=arm-linux-gnueabihf-
brook@vista:~/qemu/linux-arm$ export PATH=/opt/gcc-linaro-7.4.1-2019.02-x86_64_arm-linux-gnueabihf/bin:$PATH
brook@vista:~/qemu/linux-arm$ make vexpress_defconfig
brook@vista:~/qemu/linux-arm$ make -j8

編譯busybox
brook@vista:~/qemu/busybox$ export ARCH=arm
brook@vista:~/qemu/busybox$ export CROSS_COMPILE=arm-linux-gnueabihf-
brook@vista:~/qemu/busybox$ make O=/home/brook/qemu/busybox-build menuconfig
--> change to static busybox

brook@vista:~/qemu/busybox$ cd ../busybox-build
brook@vista:~/qemu/busybox-build$ make -j8
brook@vista:~/qemu/busybox-build$ cp busybox ../initrd-arm/bin/busybox

generate initrd-image
brook@vista:~/qemu$ ./linux-arm/usr/gen_initramfs_list.sh -d initrd-arm > /tmp/brook_initramfs_list
brook@vista:~/qemu$ ./linux-arm/usr/gen_init_cpio /tmp/brook_initramfs_list > initrd-arm.img


執行QEMU
brook@vista:~/qemu$ /usr/local/bin/qemu-system-arm -M vexpress-a9 -m 512M -kernel ./linux-arm/arch/arm/boot/zImage -dtb ./linux-arm/arch/arm/boot/dts/vexpress-v2p-ca9.dtb -initrd ./initrd-arm.img -nographic -append "console=ttyAMA0"


    參考資料:
  1. http://albert-oma.blogspot.com/2017/12/qemu-arm-linux.html, [QEMU] 模擬一個實際的 ARM Linux 嵌入式系統
  2. https://www.centennialsoftwaresolutions.com/blog/build-the-linux-kernel-and-busybox-for-arm-and-run-them-on-qemu, Build the Linux Kernel and Busybox for ARM and run them on QEMU


2019年6月15日 星期六

Build QEMU 4 on ubuntu 16.04


brook@vista$ ./configure --target-list="arm-softmmu,i386-softmmu,x86_64-softmmu,arm-linux-user,i386-linux-user,x86_64-linux-user" --enable-debug --enable-sdl --enable-kvm --enable-curl --enable-snappy --enable-tools

ERROR: User requested feature sdl
       configure was not able to find it.
       Install SDL2-devel

brook@vista$ sudo apt-get install libsdl2-2.0-0

brook@vista$ ./configure --target-list="arm-softmmu,i386-softmmu,x86_64-softmmu,arm-linux-user,i386-linux-user,x86_64-linux-user" --enable-debug --enable-sdl --enable-kvm --enable-curl --enable-snappy --enable-tools
Install prefix    /usr/local
BIOS directory    /usr/local/share/qemu
firmware path     /usr/local/share/qemu-firmware
binary directory  /usr/local/bin
library directory /usr/local/lib
module directory  /usr/local/lib/qemu
libexec directory /usr/local/libexec
include directory /usr/local/include
config directory  /usr/local/etc
local state directory   /usr/local/var
Manual directory  /usr/local/share/man
ELF interp prefix /usr/gnemul/qemu-%M
Source path       /home/brook/qemu4/qemu-4.0.0-rc4
GIT binary        git
GIT submodules
C compiler        cc
Host C compiler   cc
C++ compiler      c++
Objective-C compiler cc
ARFLAGS           rv
CFLAGS            -g

...
module support    no
host CPU          x86_64
host big endian   no
target list       arm-softmmu i386-softmmu x86_64-softmmu arm-linux-user i386-linux-user x86_64-linux-user
gprof enabled     no
sparse enabled    no
strip binaries    no
profiler          no
static build      no
SDL support       yes (2.0.4)
SDL image support no
GTK support       no
GTK GL support    no
VTE support       no
TLS priority      NORMAL
GNUTLS support    no
libgcrypt         no
nettle            no
libtasn1          no
PAM               no
iconv support     yes
curses support    yes
virgl support     no
curl support      yes
mingw32 support   no
Audio drivers     pa oss
Block whitelist (rw)
Block whitelist (ro)
VirtFS support    no
Multipath support no
VNC support       yes
VNC SASL support  no
VNC JPEG support  yes
VNC PNG support   yes
xen support       no
brlapi support    no
bluez  support    no
Documentation     no
PIE               yes
vde support       no
netmap support    no
Linux AIO support no
ATTR/XATTR support yes
Install blobs     yes
KVM support       yes
HAX support       no
HVF support       no
WHPX support      no
TCG support       yes
TCG debug enabled yes
TCG interpreter   no
malloc trim support yes
RDMA support      no
PVRDMA support    no
fdt support       git
membarrier        no
preadv support    yes
fdatasync         yes
madvise           yes
posix_madvise     yes
posix_memalign    yes
libcap-ng support no
vhost-net support yes
vhost-crypto support yes
vhost-scsi support yes
vhost-vsock support yes
vhost-user support yes
Trace backends    log
spice support     no
rbd support       no
xfsctl support    no
smartcard support no
libusb            no
usb net redir     no
OpenGL support    no
OpenGL dmabufs    no
libiscsi support  no
libnfs support    no
build guest agent yes
QGA VSS support   no
QGA w32 disk info no
QGA MSI support   no
seccomp support   no
coroutine backend ucontext
coroutine pool    yes
debug stack usage no
mutex debugging   yes
crypto afalg      no
GlusterFS support no
gcov              gcov
gcov enabled      no
TPM support       yes
libssh2 support   no
TPM passthrough
TPM emulator
QOM debugging     yes
Live block migration yes
lzo support       no
snappy support    yes
bzip2 support     no
lzfse support     no
NUMA host support no
libxml2           no
tcmalloc support  no
jemalloc support  no
avx2 optimization yes
replication support yes
VxHS block device no
bochs support     yes
cloop support     yes
dmg support       yes
qcow v1 support   yes
vdi support       yes
vvfat support     yes
qed support       yes
parallels support yes
sheepdog support  yes
capstone          internal
docker            yes
libpmem support   no
libudev           yes
default devices   yes

brook@vista$  make all 
  GEN     arm-softmmu/config-devices.mak.tmp
  GEN     arm-softmmu/config-devices.mak
  GEN     i386-softmmu/config-devices.mak.tmp
...

brook@vista$  sudo make all install
[sudo] password for brook:
make[1]: Entering directory '/home/brook/qemu4/qemu-4.0.0-rc4/slirp'

brook@vista$  /usr/local/bin/qemu-system-x86_64 -kernel linux/arch/x86/boot/bzImage -initrd initrd.img -curses 


    參考資料:
  • https://blog.csdn.net/candcplusplus/article/details/78320602, QEMU 2.10.1 编译安装


2015年6月20日 星期六

如何利用kvm/qemu練習linux module之new update


本文是如何利用kvm/qemu練習linux module的更新版。


brook@vista:~/qemu$ git clone git://git.kernel.org/pub/scm/linux/kernel/git/torvalds/linux.git linux
Cloning into 'linux'...
remote: Counting objects: 4153172, done.
remote: Compressing objects: 100% (548/548), done.
remote: Total 4153172 (delta 278), reused 0 (delta 0)
Receiving objects: 100% (4153172/4153172), 919.28 MiB | 2.32 MiB/s, done.
Resolving deltas: 100% (3423945/3423945), done.
Checking out files: 100% (49457/49457), done.
brook@vista:~/qemu$ cd linux/
brook@vista:~/qemu/linux$ git tag -l | tac | head -2
v4.1-rc8
v4.1-rc7
brook@vista:~/qemu/linux$ cp /boot/config-3.8.0-35-generic .config
brook@vista:~/qemu/linux$ make ARCH=i386 olddefconfig
  HOSTCC  scripts/basic/fixdep
  HOSTCC  scripts/kconfig/conf.o
  SHIPPED scripts/kconfig/zconf.tab.c
  SHIPPED scripts/kconfig/zconf.lex.c
  SHIPPED scripts/kconfig/zconf.hash.c
  HOSTCC  scripts/kconfig/zconf.tab.o
  HOSTLD  scripts/kconfig/conf
scripts/kconfig/conf  --olddefconfig Kconfig
.config:550:warning: symbol value 'm' invalid for ACPI_PCI_SLOT
.config:553:warning: symbol value 'm' invalid for ACPI_HOTPLUG_MEMORY
.config:665:warning: symbol value 'm' invalid for HOTPLUG_PCI_ACPI
.config:4522:warning: symbol value 'm' invalid for FB_VESA
.config:5062:warning: symbol value 'm' invalid for USB_ISP1760_HCD
.config:6150:warning: symbol value 'm' invalid for VME_BUS
#
# configuration written to .config
#
brook@vista:~/qemu/linux$ make ARCH=i386 all
scripts/kconfig/conf  --silentoldconfig Kconfig
  SYSTBL  arch/x86/syscalls/../include/generated/asm/syscalls_32.h
  SYSHDR  arch/x86/syscalls/../include/generated/uapi/asm/unistd_32.h
  SYSHDR  arch/x86/syscalls/../include/generated/uapi/asm/unistd_64.h
...(略)
  IHEX    firmware/yam/1200.bin
  IHEX    firmware/yam/9600.bin
brook@vista:~/qemu/linux$ cd ..
brook@vista:~/qemu$ git clone git://busybox.net/busybox.git
Cloning into 'busybox'...
remote: Counting objects: 91770, done.
remote: Compressing objects: 100% (23149/23149), done.
remote: Total 91770 (delta 71829), reused 86760 (delta 68061)
Receiving objects: 100% (91770/91770), 21.68 MiB | 805 KiB/s, done.
Resolving deltas: 100% (71829/71829), done.
brook@vista:~/qemu$ cd busybox
brook@vista:~/qemu/busybox$ make defconfig
scripts/kconfig/conf -d Config.in
*
* Busybox Configuration
...(略)
  Use the klogctl() interface (FEATURE_KLOGD_KLOGCTL) [Y/n/?] (NEW) y
logger (LOGGER) [Y/n/?] (NEW) y
brook@vista:~/qemu/busybox$ sed -i 's/.*CONFIG_STATIC.*/CONFIG_STATIC=y/' .config
brook@vista:~/qemu/busybox$ make CFLAGS="-m32" LDFLAGS="-m32" all
scripts/kconfig/conf -s Config.in
#
# using defaults found in .config
#
...(略)
  DOC     busybox.1
  DOC     BusyBox.html
brook@vista:~/qemu/busybox$ file busybox
busybox: ELF 32-bit LSB executable, Intel 80386, version 1 (SYSV), statically linked, for GNU/Linux 2.6.24, BuildID[sha1]=0x87675efbb7f7f810a462113cb2913bab73ffb1b6, stripped
brook@vista:~/qemu/busybox$ cd ..x
brook@vista:~/qemu$ ./create_initrd_by_linux_script.sh
+ INITD=initrd
+ rm -rf initrd
+ mkdir -p initrd/sbin initrd/bin initrd/sys initrd/tmp initrd/dev initrd/proc
+ mkdir -p initrd/usr/sbin initrd/usr/bin initrd/etc/init.d
+ install -m 0755 busybox/busybox initrd/bin
+ install -m 0755 init initrd/
+ ln -s ../bin/busybox initrd/sbin/mdev
+ ln -s busybox initrd/bin/sh
+ ln -s busybox initrd/bin/mkdir
+ ln -s busybox initrd/bin/mount
+ ./linux/scripts/gen_initramfs_list.sh -d initrd
+ ./linux/usr/gen_init_cpio /tmp/brook_initramfs_list
brook@vista:~/qemu$ qemu-system-i386 -kernel linux/arch/x86/boot/bzImage -initrd initrd.img


create_initrd_by_linux_script.sh

#!/bin/bash
INITD="initrd"
rm -rf ${INITD}
mkdir -p ${INITD}/sbin ${INITD}/bin ${INITD}/sys ${INITD}/tmp ${INITD}/dev ${INITD}/proc
mkdir -p ${INITD}/usr/sbin ${INITD}/usr/bin ${INITD}/etc/init.d
install -m 0755 busybox/busybox ${INITD}/bin
install -m 0755 init ${INITD}/
ln -s ../bin/busybox ${INITD}/sbin/mdev

ln -s busybox ${INITD}/bin/sh
ln -s busybox ${INITD}/bin/mkdir
ln -s busybox ${INITD}/bin/mount

./linux/scripts/gen_initramfs_list.sh -d ${INITD} > /tmp/brook_initramfs_list
./linux/usr/gen_init_cpio /tmp/brook_initramfs_list > initrd.img


2011年5月21日 星期六

Android on OpenWrt


這篇要介紹openwrt上面的Andorid emulator,使用openwrt只有一個原因,因為內建android emulator,只要configure好,就可以執行。
步驟如下:
brook@vista:~/projects$ git git://nbd.name/openwrt.git
brook@vista:~/projects$ cd openwrt
brook@vista:~/projects/openwrt$ make menuconfig
    Target System選擇"Goldfish (Android Emulator)"
    Target Images選擇"jffs2"
    Emulators選擇"goldfish-qemu"
brook@vista:~/projects/openwrt$ make world


有相關的package沒裝好就會出現error,再依照指示逐一裝上即可。
最後執行內建的script就可以呼叫android模擬器出來了。
brook@vista:~/projects/openwrt/bin/goldfish$ sh run-emulator.sh


    參考資料:
  • http://lwn.net/Articles/332301/
  • http://nbd.name/blog/?p=36
  • http://nbd.name/blog/?p=48
  • https://forum.openwrt.org/viewtopic.php?id=15201


2009年12月15日 星期二

如何利用kvm/qemu練習linux module


"如何利用kvm/qemu練習linux module"將介紹如何編譯一個bzImage在kvm上面執行,我們將掛上一個initramfs當我們的root filesystem,除了沒有實體的裝置以外,其實可以看成一個embedded linux了。我也是利用這種方式撰寫module的文章,因為module一寫不好,kernel就會crash了,透過vm,就不怕kernel crash了。
編譯kernel
brook@ubuntu:~$ mkdir linux
brook@ubuntu:~$ cd linux/
brook@ubuntu:~/linux$ apt-get source linux-image-2.6.31-16-generic
Reading package lists... Done
Building dependency tree       
Reading state information... Done
NOTICE: 'linux' packaging is maintained in the 'Git' version control system at:
http://kernel.ubuntu.com/git-repos/ubuntu/ubuntu-karmic.git
Need to get 81.0MB of source archives.
Get:1 http://tw.archive.ubuntu.com karmic-updates/main linux 2.6.31-16.53 (dsc) [3,781B]
0% [Waiting for headers]    
Fetched 81.0MB in 3min 29s (387kB/s)
gpgv: Signature made Tue 08 Dec 2009 11:50:10 AM CST using DSA key ID 17063E6D
gpgv: Can't check signature: public key not found
dpkg-source: warning: failed to verify signature on ./linux_2.6.31-16.53.dsc
dpkg-source: info: extracting linux in linux-2.6.31
dpkg-source: info: unpacking linux_2.6.31.orig.tar.gz
dpkg-source: info: applying linux_2.6.31-16.53.diff.gz
brook@ubuntu:~/linux$ cd linux-2.6.31
brook@ubuntu:~/linux/linux-2.6.31$ cp /boot/config-2.6.31-16-generic .config
brook@ubuntu:~/linux/linux-2.6.31$ make oldconfig
brook@ubuntu:~/linux/linux-2.6.31$ make menuconfig

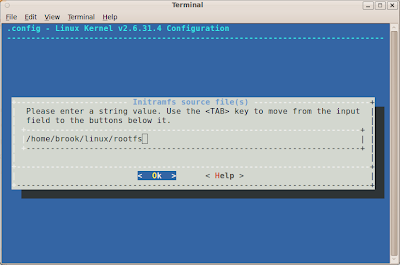
接下來要設定我們的initramfs的目錄,先make menuconfig,接著選"General setup" -> "Initramfs source file(s)",接著輸入目錄"/home/brook/linux/rootfs",注意該選項的上一個選項"Initial RAM ilesystem and RAM disk (initramfs/initrd) support"有被enabled。如果要使用的是initrd則"Initramfs source file(s)"就留空白,使用initrd的好處是,initrd有任何改變都不需要重新compile kernel。

rootfs的基本設定
brook@ubuntu:~/linux$ mkdir rootfs
brook@ubuntu:~/linux$ cd rootfs
brook@ubuntu:~/linux/rootfs$ mkdir dev
brook@ubuntu:~/linux/rootfs$ mkdir tmp
brook@ubuntu:~/linux/rootfs$ mkdir bin
brook@ubuntu:~/linux/rootfs$ mkdir sbin
brook@ubuntu:~/linux/rootfs$ mkdir etc
brook@ubuntu:~/linux/rootfs$ mkdir lib
brook@ubuntu:~/linux/rootfs$ mkdir proc
brook@ubuntu:~/linux/rootfs$ mkdir sys
brook@ubuntu:~/linux/rootfs$ mkdir usr
brook@ubuntu:~/linux/rootfs$ apt-get install busybox-static
brook@ubuntu:~/linux/rootfs$ cp /bin/busybox bin
brook@ubuntu:~/linux/rootfs$ cd bin
brook@ubuntu:~/linux/rootfs/bin$ ln -s busybox -s mkdir
brook@ubuntu:~/linux/rootfs/bin$ ln -s busybox -s mknod
brook@ubuntu:~/linux/rootfs/bin$ ln -s busybox -s mount
brook@ubuntu:~/linux/rootfs/bin$ ln -s busybox -s rm
brook@ubuntu:~/linux/rootfs/bin$ ln -s busybox -s sh
brook@ubuntu:~/linux/rootfs/bin$ cd ../sbin
brook@ubuntu:~/linux/rootfs/sbin$ ln -s ../busybox -s init
brook@ubuntu:~/linux/rootfs/sbin$ ln -s ../busybox -s mdev
brook@ubuntu:~/linux/rootfs/$ find . |cpio -H newc -o > ../initrd

如果使用的是initrd則需要用cpio壓縮這個目錄,如果是initramfs就不用最後一個指令了。

接著當然還要寫一下init script,負責開機後的一些基本設定,其內容如下
#!/bin/sh
#Mount things needed by this script
mount -t tmpfs -o size=64k,mode=0755 tmpfs /dev
mkdir /dev/pts
mount -t devpts devpts /dev/pts
/bin/mount -t proc proc /proc
/bin/mount -t sysfs sysfs /sys

#Create all the symlinks to /bin/busybox
/bin/busybox --install -s

#Create device nodes
echo /sbin/mdev > /proc/sys/kernel/hotplug
/sbin/mdev -s

exec /sbin/init
最後make bzImage即可。

接著執行kvm/qemu吧
brook@ubuntu:~/linux/linux-2.6.31$ kvm -no-acpi -kernel arch/x86_64/boot/bzImage -net nic,model=pcnet -net tap,ifname=tap0,script=no

如果是initrd則需要多一個參數給kvm/qemu。
brook@ubuntu:~/linux/linux-2.6.31$ kvm -no-acpi -kernel arch/x86_64/boot/bzImage -initrd /home/brook/initrd -net nic,model=pcnet -net tap,ifname=tap0,script=no


2009年11月25日 星期三

U-Boot Standalone Applications


U-Boot支援"standlone" applications,可以動態的load並且執行。這些application可以存取U-Boot的I/O,memort和interrupt services。

在U-Boot目錄裡面有example,裡面就有"standlone" application的範例,只要確定U-Boot/Makefile的SUBDIRS有將example包含進去即可。接著我們就用loads指令將hello_world.srec載到U-Boot上,並且執行。注意:要將modem設為ASCII。

這樣可以快速的在U-Boot上發展一些應用程式。


熱門文章