顯示具有 tools - devel 標籤的文章。 顯示所有文章

2017年4月30日 星期日

pkg-config


簡介

現在的電腦系統使用許多library package供使用者使用,但是在不同的platform使用這些library package是一件很困難的事,pkg-config收集相關的資訊並且統一的API供開發人員使用。 pkg-config利用".pc"檔的格式,記錄了一些library相關的資訊,提供對應的information給開發人員使用,以ubuntu為例,這些檔案被放置在/usr/lib/x86_64-linux-gnu/pkgconfig、/usr/lib/i386-linux-gnu/pkgconfig與/usr/lib/pkgconfig等目錄,以下為directfb的.pc
brook@vista:~$ cat /usr/lib/x86_64-linux-gnu/pkgconfig/directfb.pc
prefix=/usr
exec_prefix=${prefix}
libdir=${prefix}/lib/x86_64-linux-gnu
includedir=${prefix}/include

Name: DirectFB
Description: Graphics and windowing library for the Linux frame buffer device
Version: 1.2.10
Requires: fusion direct
Libs: -L${libdir} -ldirectfb -lpthread
Libs.private: -L${libdir} -ldl
Cflags: -D_REENTRANT -I${prefix}/include/directfb
brook@vista:~$ pkg-config --list-all
file_name_of_library_or_package          Name_in_pc - Description_in_pc
...
direct                         Direct - DirectFB base development library
...

PC檔內容

.pc包含了事先定義好的variable(key=value)與description(Name: description),description有以下資訊
Name: library的name。
Description: library的簡述。
URL: library的相關URL。
Version: library的版號資訊。
Requires: library所需要的library,可能會包含所需的版號資訊(=, <, >, <= or >=)。
Requires.private: 與 Requires相似,用於static link。
Conflicts: library可能與某個library衝突的資訊,可能會包含衝突的版號資訊(=, <, >, <= or >=)。
Cflags: 使用該library所需的compiler flags。
Libs: 使用該library所需的link flags。
Libs.private: 與Libs相似,用於static link。

pkg-config操作

基本語法為pkg-config [input parameters] [LIBRARIES...]相關input參數可以參考man page
brook@vista:~$ pkg-config --modversion --print-errors directfb
1.2.10
brook@vista:~$ pkg-config --cflags --print-errors directfb
-D_REENTRANT -I/usr/include/directfb
brook@vista:~$ pkg-config --libs --print-errors directfb
-ldirectfb -lpthread -lfusion -ldirect -lpthread
brook@vista:~$ pkg-config --libs --static --print-errors directfb
-ldirectfb -lpthread -ldl -lfusion -ldirect -lpthread -ldl
brook@vista:~$ pkg-config --print-requires --print-errors directfb
fusion
direct
brook@vista:~$ pkg-config --print-requires --print-errors "directfb > 1.3"
Requested 'directfb > 1.3' but version of DirectFB is 1.2.10
brook@vista:~$ pkg-config --exists --print-errors directfb
brook@vista:~$ echo $?
0
brook@vista:~$ pkg-config --exists --print-errors directfbxx
Package directfbxx was not found in the pkg-config search path.
Perhaps you should add the directory containing `directfbxx.pc'
to the PKG_CONFIG_PATH environment variable
No package 'directfbxx' found
brook@vista:~$ echo $?
1

pkg-config實際應用

With GCC
brook@vista:~$ pkg-config --cflags --libs directfb
-D_REENTRANT -I/usr/include/directfb -ldirectfb -lpthread -lfusion -ldirect -lpthread
brook@vista:~$ gcc `pkg-config --cflags --libs directfb` -o myapp myapp.c

With autoconf and automake
configure.ac:
PKG_CHECK_MODULES([DIRECTFB], [directfb])

Makefile.am:
myapp_CFLAGS = $(DIRECTFB_CFLAGS)
myapp_LDADD = $(DIRECTFB_LIBS)

    參考資料:
  1. 簡介 pkg-config 的功能與用法, http://yczhuang.blogspot.tw/2007/04/pkg-config.html
  2. Guide to pkg-config, https://people.freedesktop.org/~dbn/pkg-config-guide.html#writing
  3. pkg-config 使用及建立方法, http://jyhshin.pixnet.net/blog/post/26588033-pkg-config-%E4%BD%BF%E7%94%A8%E5%8F%8A%E5%BB%BA%E7%AB%8B%E6%96%B9%E6%B3%95


2016年9月17日 星期六

build 32bit app on 64bit Machine -- /usr/bin/ld: skipping incompatible


我將Ubuntu從14.04換到16.04後,系統好像移除了一些package,導致build 32bit的程式會failed。 安裝lib32gcc-4.7-dev之後就解了。
brook@vista:~$ uname -a
Linux vista 4.4.0-36-generic #55-Ubuntu SMP Thu Aug 11 18:01:55 UTC 2016 x86_64 x86_64 x86_64 GNU/Linux
brook@vista:~$ cat /etc/issue
Ubuntu 16.04.1 LTS \n \l
brook@vista:~$ gcc -m32 x.c
/usr/bin/ld: skipping incompatible /usr/lib/gcc/x86_64-linux-gnu/4.7/libgcc.a when searching for -lgcc
/usr/bin/ld: cannot find -lgcc
/usr/bin/ld: skipping incompatible /usr/lib/gcc/x86_64-linux-gnu/4.7/libgcc_s.so when searching for -lgcc_s
/usr/bin/ld: cannot find -lgcc_s
collect2: error: ld returned 1 exit status
brook@vista:~$ gcc -v
Using built-in specs.
COLLECT_GCC=gcc
COLLECT_LTO_WRAPPER=/usr/lib/gcc/x86_64-linux-gnu/4.7/lto-wrapper
Target: x86_64-linux-gnu
Configured with: ../src/configure -v --with-pkgversion='Ubuntu/Linaro 4.7.4-3ubuntu12' --with-bugurl=file:///usr/share/doc/gcc-4.7/README.Bugs --enable-languages=c,c++,go,fortran,objc,obj-c++ --prefix=/usr --program-suffix=-4.7 --enable-shared --enable-linker-build-id --libexecdir=/usr/lib --without-included-gettext --enable-threads=posix --with-gxx-include-dir=/usr/include/c++/4.7 --libdir=/usr/lib --enable-nls --with-sysroot=/ --enable-clocale=gnu --enable-libstdcxx-debug --enable-gnu-unique-object --disable-libmudflap --enable-plugin --with-system-zlib --enable-objc-gc --with-cloog --enable-cloog-backend=ppl --disable-cloog-version-check --disable-ppl-version-check --enable-multiarch --disable-werror --with-arch-32=i686 --with-abi=m64 --with-multilib-list=m32,m64,mx32 --with-tune=generic --enable-checking=release --build=x86_64-linux-gnu --host=x86_64-linux-gnu --target=x86_64-linux-gnu
Thread model: posix
gcc version 4.7.4 (Ubuntu/Linaro 4.7.4-3ubuntu12)
brook@vista:~$ sudo apt-get install lib32gcc-4.7-dev


2015年5月10日 星期日

Gerrit How-to


先建立SSH Key

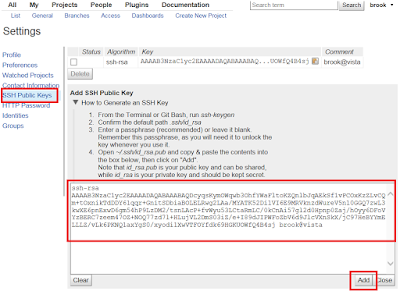
利用ssh-keygen產生ssh key,為了方便,我的passphrase是空白,這樣git操作時就不用問密碼了
brook@vista:~$ ssh-keygen
Generating public/private rsa key pair.
Enter file in which to save the key (/home/brook/.ssh/id_rsa):
Enter passphrase (empty for no passphrase):
Enter same passphrase again:
Your identification has been saved in /home/brook/.ssh/id_ras.
Your public key has been saved in /home/brook/.ssh/id_ras.pub.
The key fingerprint is:
be:5a:86:da:2f:9f:b1:fb:97:f1:bc:bd:30:ba:2a:56 brook@vista
The key's randomart image is:
+--[ RSA 2048]----+
|                 |
|                 |
|                 |
|                 |
|        S        |
|       o E  .    |
|      . *    B   |
|     o.= =  + =. |
|    . +=O+o+. .oo|
+-----------------+
brook@vista:~$ cat /home/brook/.ssh/id_ras.pub
ssh-rsa AAAAB3NzaC1yc2EAAAADAQABAAABAQDcyqsKymOWqwb3OhfYWaFltoKZQnlbJqAEkSf1vPCOxKzZLvCQm+tOxnikTdDDY61qqr+GnitSDbiaBOLELRwg2LAa/MYATK52Di1VI6E9MRVknzdWureV5n10GGQ7zwL3kwXE6pnExwD6gm54hP9LzDM2/tsnLAcP+fvWyu53LCtaRmLC/0kCnAi57gl2d0Hpnp0Zaj/hOyy6DFoVYzBERC7zeem47OZ+NOQ77zd7l+HLujVL2DmS03iZ/e+I89dJIPWFoZbV6d9JlcVXnSkX/jC97HeBYYmELLLZ/vLk6PKNQ1axYgS0/xyodi1XwVTFOYfdk69HGKUOWfQ4B4sj brook@vista
brook@vista:~$

產生出來的Public Key就貼到Setting/SSH Public Keys中,如下圖


Create New Project

接下來就是建立一個新的Project,基本上只要點選Create New Project並填入名稱大致就完成了


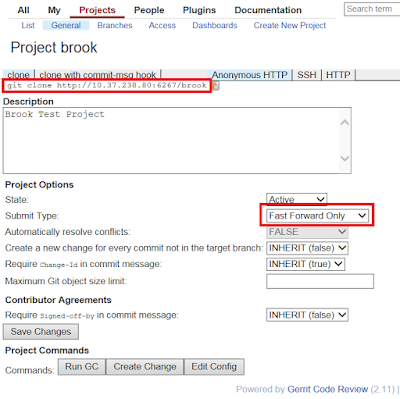
接著我將Project的Submit Type設定為FF,因為我不太喜歡有很多merge的log存在

Clone/Push/Pull Project

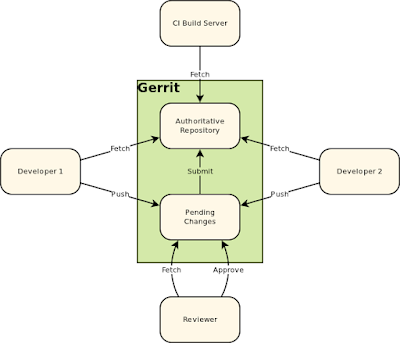
基本上跟一般git操作沒兩樣,差在gerrit每個commit需要change-id,必須push到refs/for/branch_name等待review,這觀念可以參考下圖
brook@vista:~$ git clone ssh://brook@vista:29418/brook
Cloning into 'brook'...
The authenticity of host '[1.3.2.8]:29418 ([1.3.2.8]:29418)' can't be established.
RSA key fingerprint is cc:29:ae:12:64:ff:e0:19:9b:d1:e4:61:b1:63:4c:51.
Are you sure you want to continue connecting (yes/no)? yes
Warning: Permanently added '[1.3.2.8]:29418' (RSA) to the list of known hosts.
remote: Counting objects: 2, done
remote: Finding sources: 100% (2/2)
remote: Total 2 (delta 0), reused 0 (delta 0)
Receiving objects: 100% (2/2), done.
brook@vista:~$ cd brook/
brook@vista:~/brook$ git remote -v
origin  ssh://brook@1.3.2.8:29418/brook (fetch)
origin  ssh://brook@1.3.2.8:29418/brook (push)
brook@vista:~/brook$ git branch -a
* master
  remotes/origin/HEAD -> origin/master
  remotes/origin/master
brook@vista:~/brook$ git log --stat
commit 79b2500f123690b50df8fa4e5fe9d4bf4459f4d9
Author: Brook Kuo <rene3210@gmail.com.tw>
Date:   Sat May 16 10:23:50 2015 +0800

    Initial empty repository
brook@vista:~/brook$ echo brook > myfile.txt
brook@vista:~/brook$ git add -f myfile.txt
brook@vista:~/brook$ git commit -m "brook 1st commit"
[master 7764665] brook 1st commit
 1 file changed, 1 insertion(+)
 create mode 100644 myfile.txt
brook@vista:~/brook$ git push origin HEAD:refs/for/master
Counting objects: 4, done.
Writing objects: 100% (3/3), 251 bytes, done.
Total 3 (delta 0), reused 0 (delta 0)
remote: Processing changes: refs: 1, done
remote: ERROR: missing Change-Id in commit message footer
remote:
remote: Hint: To automatically insert Change-Id, install the hook:
remote:   gitdir=$(git rev-parse --git-dir); scp -p -P 29418 brook@1.3.2.8:hooks/commit-msg ${gitdir}/hooks/
remote: And then amend the commit:
remote:   git commit --amend
remote:
To ssh://brook@1.3.2.8:29418/brook
 ! [remote rejected] HEAD -> refs/for/master (missing Change-Id in commit message footer)
error: failed to push some refs to 'ssh://brook@1.3.2.8:29418/brook'
brook@vista:~/brook$ gitdir=$(git rev-parse --git-dir); scp -p -P 29418 brook@1.3.2.8:hooks/commit-msg ${gitdir}/hooks/
commit-msg                                                                                 100% 4360     4.3KB/s   00:00
brook@vista:~/brook$ git commit --amend -m "brook 1st commit"
[master 994ca11] brook 1st commit
 1 file changed, 1 insertion(+)
 create mode 100644 myfile.txt
brook@vista:~/brook$ git log -1
commit 994ca118b141529f8b9ce4269a896c35b8730508
Author: Brook Kuo <rene3210@gmail.com.tw>
Date:   Sat May 16 11:09:11 2015 +0800

    brook 1st commit

    Change-Id: I9084cc25762e052527af98a335efb890c5ea3e89
brook@vista:~/brook$ git push origin HEAD:refs/for/master
Counting objects: 4, done.
Writing objects: 100% (3/3), 291 bytes, done.
Total 3 (delta 0), reused 0 (delta 0)
remote: Processing changes: new: 1, refs: 1, done
remote:
remote: New Changes:
remote:   http://1.3.2.8:6267/1 brook 1st commit
remote:
To ssh://brook@1.3.2.8:29418/brook
 * [new branch]      HEAD -> refs/for/master


圖來自https://review.openstack.org/Documentation/images/intro-quick-central-gerrit.png


Review and Submit


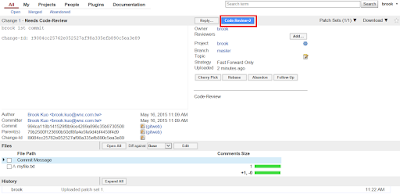
基本上Gerrit就是個網頁review system,直接網頁點選就可以完成review/submit等動作
Open頁面顯示待review之commit


點選+2,只有+2才能被submit


點選Submit,code才能真正被merge到project中


Merge頁面顯示被merge的commit


2015年5月1日 星期五

安裝Gerrit


Gerrit,是一種以GIT作為底層的code review system,它使用網頁介面,讓團隊進行review,決定是否能夠提交,退回或是繼續修改。
可以由此download, https://gerrit-releases.storage.googleapis.com/index.html

安裝步驟可以參考裡面的Documentation,

1. 先建立database

我是採用mysql,其他db的設定可以參考Gerrit的Document。
  CREATE USER 'gerrit2'@'localhost' IDENTIFIED BY 'secret';
  CREATE DATABASE reviewdb;
  GRANT ALL ON reviewdb.* TO 'gerrit2'@'localhost';
  FLUSH PRIVILEGES;


2. Initialize the Site

基本上gerrit2會跳出對話框,將問題的資訊填完就可以安奘成功了。
gerrit2@vista:~$ ls
examples.desktop  gerrit-2.11.war
gerrit2@vista:~$ java -jar gerrit-2.11.war init -d review_site
Using secure store: com.google.gerrit.server.securestore.DefaultSecureStore

*** Gerrit Code Review 2.11
***

Create '/home/gerrit2/review_site' [Y/n]?

*** Git Repositories
***

Location of Git repositories   [git]:

*** SQL Database
***

Database server type           [h2]: mysql

Gerrit Code Review is not shipped with MySQL Connector/J 5.1.21
**  This library is required for your configuration. **
Download and install it now [Y/n]?
Downloading http://repo2.maven.org/maven2/mysql/mysql-connector-java/5.1.21/mysql-connector-java-5.1.21.jar ... OK
Checksum mysql-connector-java-5.1.21.jar OK
Server hostname                [localhost]:
Server port                    [(mysql default)]:
Database name                  [reviewdb]:
Database username              [gerrit2]:
gerrit2's password             :
              confirm password :

*** Index
***

Type                           [LUCENE/?]:

*** User Authentication
***

Authentication method          [OPENID/?]:

*** Review Labels
***

Install Verified label         [y/N]?

*** Email Delivery
***

SMTP server hostname           [localhost]:
SMTP server port               [(default)]:
SMTP encryption                [NONE/?]:
SMTP username                  :

*** Container Process
***

Run as                         [gerrit2]:
Java runtime                   [/usr/lib/jvm/java-7-openjdk-amd64/jre]:
Copy gerrit-2.11.war to /home/gerrit2/review_site/bin/gerrit.war [Y/n]?
Copying gerrit-2.11.war to /home/gerrit2/review_site/bin/gerrit.war

*** SSH Daemon
***


Listen on address              [*]:
Listen on port                 [29418]:

Gerrit Code Review is not shipped with Bouncy Castle Crypto SSL v151
  If available, Gerrit can take advantage of features
  in the library, but will also function without it.
Download and install it now [Y/n]?
Downloading http://www.bouncycastle.org/download/bcpkix-jdk15on-151.jar ... OK
Checksum bcpkix-jdk15on-151.jar OK

Gerrit Code Review is not shipped with Bouncy Castle Crypto Provider v151
** This library is required by Bouncy Castle Crypto SSL v151. **
Download and install it now [Y/n]?
Downloading http://www.bouncycastle.org/download/bcprov-jdk15on-151.jar ... OK
Checksum bcprov-jdk15on-151.jar OK
Generating SSH host key ... rsa... dsa... done

*** HTTP Daemon
***

Behind reverse proxy           [y/N]?
Use SSL (https://)             [y/N]?
Listen on address              [*]:
Listen on port                 [8080]: 6267
Canonical URL                  [http://localhost:6267/]:

*** Plugins
***

Installing plugins.
Install plugin download-commands version v2.11 [y/N]?
Install plugin reviewnotes version v2.11 [y/N]?
Install plugin singleusergroup version v2.11 [y/N]?
Install plugin replication version v2.11 [y/N]?
Install plugin commit-message-length-validator version v2.11 [y/N]?
Initializing plugins.
No plugins found with init steps.

Execute now [Y/n]?
Initialized /home/gerrit2/review_site
Executing /home/gerrit2/review_site/bin/gerrit.sh start
Starting Gerrit Code Review: OK
Waiting for server on localhost:6267 ... OK


3. Start/Stop Daemon


可以透過review_site/bin/gerrit.sh將deamon進行開關,通常我會在rc5.d中建立link到該script中
review_site/bin/gerrit.sh start
review_site/bin/gerrit.sh stop
review_site/bin/gerrit.sh restart


4. Setup Administrator

可以用Web開啟gerrit並且設定第一個User,即Adminstrator。

基本上我是自己建立一個OpenID,你可以選擇其他認證方式。


參考資料: Gerrit Document


2014年6月15日 星期日

git - push to non-bare repository


如果push到non-bare的repository,則會被reject,必須將該repository的receive.denyCurrentBranch設為ignore

brook@vista:~/x2$ git push origin HEAD
Counting objects: 3, done.
Delta compression using up to 4 threads.
Compressing objects: 100% (2/2), done.
Writing objects: 100% (2/2), 227 bytes, done.
Total 2 (delta 0), reused 0 (delta 0)
remote: error: refusing to update checked out branch: refs/heads/master
remote: error: By default, updating the current branch in a non-bare repository
remote: error: is denied, because it will make the index and work tree inconsistent
remote: error: with what you pushed, and will require 'git reset --hard' to match
remote: error: the work tree to HEAD.
remote: error:
remote: error: You can set 'receive.denyCurrentBranch' configuration variable t
remote: error: 'ignore' or 'warn' in the remote repository to allow pushing int
remote: error: its current branch; however, this is not recommended unless you
remote: error: arranged to update its work tree to match what you pushed in some
remote: error: other way.
remote: error:
remote: error: To squelch this message and still keep the default behaviour, see
remote: error: 'receive.denyCurrentBranch' configuration variable to 'refuse'.
To /home/brook/x
 ! [remote rejected] HEAD -> master (branch is currently checked out)
error: failed to push some refs to '/home/brook/x'

編輯該repoistory底下的.git/config
[receive]
    denyCurrentBranch = ignore


相關文章:
git筆記


2010年12月12日 星期日

用一張圖來為 Git 快速入門(Git Cheat Sheet)


用一張圖來為 Git 快速入門(Git Cheat Sheet)


參考資料:
網路


2010年12月5日 星期日

git筆記


先把用過的指令List出來
git init
Create an empty git repository or reinitialize an existing one

git add
Add file contents to the index

git commit
Record changes to the repository

git log
Show commit logs.

git config
Get and set repository or global options.

git branch
List, create, or delete branches.

git checkout
Checkout a branch or paths to the working tree.

git clone
Clone a repository into a new directory.


建立Local Repository並且加入新檔
brook@vista:~/git_test$ git init
Initialized empty Git repository in /home/brook/git_test/.git/
brook@vista:~/git_test$ echo 1 > a.txt
brook@vista:~/git_test$ git add .
brook@vista:~/git_test$ git commit -a -m "init version"
[master (root-commit) 3f4bf46] init version
 1 files changed, 1 insertions(+), 0 deletions(-)
 create mode 100644 a.txt
brook@vista:~/git_test$ git log --stat
commit 3f4bf46a188e676104bd8bb929a8ba85e85bb536
Author: Brook <rene3210@>
Date:   Sat Dec 4 22:21:16 2010 +0800

    init version

 a.txt |    1 +
 1 files changed, 1 insertions(+), 0 deletions(-)


透過ssh複製遠端的Repository
brook@vista:~/git_test2$ git clone ssh://brook@127.0.0.1/home/brook/git_test/ .
Initialized empty Git repository in /home/brook/git_test2/git_test/.git/
brook@127.0.0.1's password: 
remote: Counting objects: 3, done.
remote: Total 3 (delta 0), reused 0 (delta 0)
Receiving objects: 100% (3/3), done.
brook@vista:~/git_test2$ ls
a.txt


建立branch/複製遠端的branch
brook@vista:~/git_test$ git branch 顯示目前的branch
* master
brook@vista:~/git_test$ git branch new_branch建立一個名為new_branch的branch
brook@vista:~/git_test$ git branch 
* master
  new_branch
brook@vista:~/git_test$ git checkout new_branch 切換到new_branch
Switched to branch 'new_branch'
brook@vista:~/git_test$ git branch 
  master
* new_branch

複製遠端的branch
brook@vista:~/git_test2$ git checkout --track origin/new_branch 
Branch new_branch set up to track remote branch new_branch from origin.
Switched to a new branch 'new_branch'
brook@vista:~/git_test2$ git branch 
  master
* new_branch

利用pull(下載)/push(上傳)更新資料
利用pull更新資料
brook@vista:~/test$ mkdir git1
brook@vista:~/test$ mkdir git2
brook@vista:~/test$ cd git1/
brook@vista:~/test/git1$ git init
Initialized empty Git repository in /home/brook/test/git1/.git/
brook@vista:~/test/git1$ echo "01" > 01.txt
brook@vista:~/test/git1$ git add 01.txt
brook@vista:~/test/git1$ git commit -a -m "v1"
[master (root-commit) 6d3302a] v1
 1 files changed, 1 insertions(+), 0 deletions(-)
 create mode 100644 01.txt
brook@vista:~/test/git1$ cd ../git2
brook@vista:~/test/git2$ git clone ../git1 .
Initialized empty Git repository in /home/brook/test/git2/.git/
brook@vista:~/test/git2$ ls
01.txt
brook@vista:~/test/git2$ cd ../git1
brook@vista:~/test/git1$ echo "012" > 01.txt 
brook@vista:~/test/git1$ git commit -a -m "v2"
[master 9824999] v2
 1 files changed, 1 insertions(+), 1 deletions(-)
brook@vista:~/test/git1$ cd ../git2/
brook@vista:~/test/git2$ git pull
remote: Counting objects: 5, done.
remote: Total 3 (delta 0), reused 0 (delta 0)
Unpacking objects: 100% (3/3), done.
From /home/brook/test/git2/../git1
   6d3302a..9824999  master     -> origin/master
Updating 6d3302a..9824999
Fast-forward
 01.txt |    2 +-
 1 files changed, 1 insertions(+), 1 deletions(-)
brook@vista:~/test/git2$ cat 01.txt 
012

利用push(上傳)更新資料
brook@vista:~/test/git2$ echo "0123" > 01.txt 
brook@vista:~/test/git2$ git commit -a -m "v3"
[master 3dd46af] v3
 1 files changed, 1 insertions(+), 1 deletions(-)
brook@vista:~/test/git2$ git push
Counting objects: 5, done.
Writing objects: 100% (3/3), 231 bytes, done.
Total 3 (delta 0), reused 0 (delta 0)
Unpacking objects: 100% (3/3), done.
remote: error: refusing to update checked out branch: refs/heads/master
remote: error: By default, updating the current branch in a non-bare repository
remote: error: is denied, because it will make the index and work tree inconsist
ent
remote: error: with what you pushed, and will require 'git reset --hard' to matc
h
remote: error: the work tree to HEAD.
remote: error: 
remote: error: You can set 'receive.denyCurrentBranch' configuration variable t
remote: error: 'ignore' or 'warn' in the remote repository to allow pushing int
remote: error: its current branch; however, this is not recommended unless you
remote: error: arranged to update its work tree to match what you pushed in som
remote: error: other way.
remote: error: 
remote: error: To squelch this message and still keep the default behaviour, se
remote: error: 'receive.denyCurrentBranch' configuration variable to 'refuse'.
To /home/brook/test/git2/../git1
 ! [remote rejected] master -> master (branch is currently checked out)
error: failed to push some refs to '/home/brook/test/git2/../git1'
brook@vista:~/test/git2$ vim ../git1/.git/config 
[core]
    repositoryformatversion = 0
    filemode = true
    bare = false
    logallrefupdates = true
[receive]
    denyCurrentBranch = false
brook@vista:~/test/git2$ git push
Counting objects: 5, done.
Writing objects: 100% (3/3), 231 bytes, done.
Total 3 (delta 0), reused 0 (delta 0)
Unpacking objects: 100% (3/3), done.
To /home/brook/test/git2/../git1
   9824999..3dd46af  master -> master
brook@vista:~/test/git2$ cd ../git1
brook@vista:~/test/git1$ git log -1
commit 3dd46af43524c4e81597f392f58899c78faf087b
Author: Brook <rene3210@>
Date:   Wed Dec 15 22:37:39 2010 +0800

    v3

merge預設會將每一個change重作一次
rook@vista:~/git$ git init
Initialized empty Git repository in /home/brook/git/.git/
brook@vista:~/git$ echo "01" > 01.txt
brook@vista:~/git$ git add 01.txt
brook@vista:~/git$ git commit -a -m "v1"
[master (root-commit) 0b7b5ea] v1
 1 files changed, 1 insertions(+), 0 deletions(-)
 create mode 100644 01.txt
brook@vista:~/git$ git branch my_branch
brook@vista:~/git$ git checkout my_branch 
Switched to branch 'my_branch'
brook@vista:~/git$ git branch 
  master
* my_branch
brook@vista:~/git$ echo "012" > 01.txt 
brook@vista:~/git$ git commit -a -m "v2"
[my_branch de5e153] v2
 1 files changed, 1 insertions(+), 1 deletions(-)
brook@vista:~/git$ echo "0123" > 01.txt 
brook@vista:~/git$ git commit -a -m "v3"
[my_branch a8d702d] v3
 1 files changed, 1 insertions(+), 1 deletions(-)
brook@vista:~/git$ echo "01234" > 01.txt 
brook@vista:~/git$ git commit -a -m "v4"
[my_branch 8bae340] v4
 1 files changed, 1 insertions(+), 1 deletions(-)
brook@vista:~/git$ git log
commit 8bae34004943242020b4e1b54726ae1bb77bb991
Author: Brook <rene3210@>
Date:   Wed Dec 15 22:50:43 2010 +0800

    v4

commit a8d702da300bbf643c5b7a7f3be60d7133658b5f
Author: Brook <rene3210@>
Date:   Wed Dec 15 22:50:26 2010 +0800

    v3

commit de5e153e8f3414ede60891c21686811b2cf704a6
Author: Brook <rene3210@>
Date:   Wed Dec 15 22:50:16 2010 +0800

    v2

commit 0b7b5ead8e486ba7dc3f1dc75498f27ebd008805
Author: Brook <rene3210@>
Date:   Wed Dec 15 22:49:11 2010 +0800

    v1
brook@vista:~/git$ git checkout master 
Switched to branch 'master'
brook@vista:~/git$ git merge my_branch 
Updating 0b7b5ea..8bae340
Fast-forward
 01.txt |    2 +-
 1 files changed, 1 insertions(+), 1 deletions(-)
brook@vista:~/git$ cat 01.txt 
01234
brook@vista:~/git$ git log 
commit 8bae34004943242020b4e1b54726ae1bb77bb991
Author: Brook <rene3210@>
Date:   Wed Dec 15 22:50:43 2010 +0800

    v4

commit a8d702da300bbf643c5b7a7f3be60d7133658b5f
Author: Brook <rene3210@>
Date:   Wed Dec 15 22:50:26 2010 +0800

    v3

commit de5e153e8f3414ede60891c21686811b2cf704a6
Author: Brook <rene3210@>
Date:   Wed Dec 15 22:50:16 2010 +0800

    v2

commit 0b7b5ead8e486ba7dc3f1dc75498f27ebd008805
Author: Brook <rene3210@>
Date:   Wed Dec 15 22:49:11 2010 +0800

    v1

subversion方式的merge(squash)
brook@vista:~/git$ git init
Initialized empty Git repository in /home/brook/git/.git/
brook@vista:~/git$ echo "01" > 01.txt
brook@vista:~/git$ git add .
brook@vista:~/git$ git commit -a -m "v1"
[master (root-commit) fbf643a] v1
 1 files changed, 1 insertions(+), 0 deletions(-)
 create mode 100644 01.txt
brook@vista:~/git$ git branch my_branch
brook@vista:~/git$ git checkout my_branch 
Switched to branch 'my_branch'
brook@vista:~/git$ echo "012" > 01.txt
brook@vista:~/git$ git commit -a -m "v2"
[my_branch 51c6575] v2
 1 files changed, 1 insertions(+), 1 deletions(-)
brook@vista:~/git$ echo "0123" > 01.txt
brook@vista:~/git$ git commit -a -m "v3"
[my_branch 67873cb] v3
 1 files changed, 1 insertions(+), 1 deletions(-)
brook@vista:~/git$ git log
commit 67873cb645636a0ab70309cfa65b678ed49eb2b9
Author: Brook <rene3210@>
Date:   Wed Dec 15 22:58:42 2010 +0800

    v3

commit 51c6575ba88dcfb8a3cfd19b2b4d36ae85fd5ac1
Author: Brook <rene3210@>
Date:   Wed Dec 15 22:58:37 2010 +0800

    v2

commit fbf643a72076d43c16a089c2fe330c357bba004e
Author: Brook <rene3210@>
Date:   Wed Dec 15 22:58:12 2010 +0800

    v1
brook@vista:~/git$ git checkout master 
Switched to branch 'master'
brook@vista:~/git$ git merge --squash my_branch 
Updating fbf643a..67873cb
Fast-forward
Squash commit -- not updating HEAD
 01.txt |    2 +-
 1 files changed, 1 insertions(+), 1 deletions(-)
brook@vista:~/git$ git commit -a -m "merge with squash"
[master eefb013] merge with squash
 1 files changed, 1 insertions(+), 1 deletions(-)
brook@vista:~/git$ git log
commit eefb0132ae0c1eaa40b746bca7b5440c54e63cb2
Author: Brook <rene3210@>
Date:   Wed Dec 15 23:00:49 2010 +0800

    merge with squash

commit fbf643a72076d43c16a089c2fe330c357bba004e
Author: Brook <rene3210@>
Date:   Wed Dec 15 22:58:12 2010 +0800

    v1


2009年11月14日 星期六

vmware的timekeeping問題


您是不是常常被vmware抱怨CPU速度和偵測到的速度不符合,這是由於x86的power-saving讓CPU降頻執行所導致,解決的方法就是告知vmware,CPU的正確頻率是多少,找到設定檔config.ini,然後設定CPU頻率:
  • Windows 2000 or XP - %AllUsersProfile%\Application Data\VMware\<VMware-Product>\config.ini
  • Windows Vista or Windows 7 - C:\ProgramData\VMware\VMware\<VMware-Product>\config.ini

不存在的話就自行建立新檔,並且將以下字串貼入其中:
host.cpukHz = "2000000"
      host.noTSC = "TRUE"
      ptsc.noTSC = "TRUE"

"2000000"是我的電腦速度2G,請依照您的頻率調整。 參考資料:
http://kb.vmware.com/selfservice/microsites/search.do?language=en_US&cmd=displayKC&externalId=1227


2009年7月8日 星期三

doxygen


Doxygen 是一個document generator,可以將程式中的註解轉換成為說明文件。通常我們在寫程式時,或多或少都會寫上註解,如果在寫註解的時候能依據某種格式,接著就可以透過document generator產生出漂亮的文件。Doxygen支援的程式語言包含C++、C、Java、Objective-C、Python、IDL(Corba and Microsoft flavors)、Fortran、VHDL、PHP和C#等。而且可以產生出的格式有HTML、RTF(MS-Word)、PostScript、PDF、manpage等。
安裝步驟就不多說了,直接來看doxygen的格式。
doxygen支援C-style,如:
/**
 * ... text ...
 */

Qt-style
/*!
 * ... text ...
 */

C++-style
///
/// ... text ...
///
//!
//!... text ...
//!
簡單範例doxy.c
#include 

/**
 * sum of two integer
 *
 * @param a an integer
 * @param b an integer
 * @return the sum of two integer
 */
int sum(int a, int b)
{
    return (a+b);
}

int main(int argc, char *argv[])
{
    int a = 5, b = 10;

    printf("%d\n", sum(a, b));
    return 0;
}
doxygen指令必須搭配設定檔(config),要記住的tag=value需要查閱一番,所以,我們就用gui - doxywizard來設定並且產生文件吧。
最重要的就是填入source所在的目錄(source code directory)以及檔案輸出的目錄(destination directory)。這邊還有輸入工作目錄(working directory)、專案名稱(project name)以及專案版本(Project version or id)。

這邊選擇您的程式用哪種語言寫的。

這邊選擇輸出的格式以及格式的設定。

這邊選擇要輸出的圖示有哪些。

最後切到執行(run)這個頁面,按下Run doxygen執行doxygen。


產出的文件真是讓我沒話說的好。

2009年7月6日 星期一

indent - format your code


indent主要用來排版C code,因為coding風格差異其實不小(BSD/GNU/K&R/linux,其實最主要是很多人喜歡自創風格),但是如果大家都能使用特定的coding風格,相信熟悉此一風格的人很快的就能進入狀況。 但是,現在流行混搭風,有些地方用BSD,某些又跟隨gnu的風格,實在是有點小亂,慘的是,還有自創風格,雖說coding風格一致即可,不過要一群人跟隨你的風格可能也是不妥。
所以,我們可以利用indent,將code排成某特定風格,這樣大家都能很快的進入狀況。對於code的編排風格,建議先參考http://en.wikipedia.org/wiki/Indent_style,了解一下各大宗的原始風貌,再來研究indent(我也是混搭風的愛好者@@)
原始程式碼
brook@ctc-desktop:~$ cat xx.c
#include <stdio.h>
int main(int argc, char *argv[])
{
    int x;
    for(x=0;x<10;x++) { printf("%d\n", x); }
    switch(x) {
        case 1:
            printf("one\n");
            break;
        default:
            printf("default\n");
    }
    if(x==0) {printf("zero\n");}
    else if (x==2) {printf("two\n");}
    else {printf("no match\n");}
    return 0;
}


K&R的風格
brook@ctc-desktop:~$ indent -kr -st xx.c
#include <stdio.h>
int main(int argc, char *argv[])
{
    int x;
    for (x = 0; x < 10; x++) {
        printf("%d\n", x);
    }
    switch (x) {
    case 1:
        printf("one\n");
        break;
    default:
        printf("default\n");
    }
    if (x == 0) {
        printf("zero\n");
    } else if (x == 2) {
        printf("two\n");
    } else {
        printf("no match\n");
    }
    return 0;
}


gnu的風格
brook@ctc-desktop:~$ indent -gnu -st xx.c
#include <stdio.h>
int
main (int argc, char *argv[])
{
  int x;
  for (x = 0; x < 10; x++)
    {
      printf ("%d\n", x);
    }
  switch (x)
    {
    case 1:
      printf ("one\n");
      break;
    default:
      printf ("default\n");
    }
  if (x == 0)
    {
      printf ("zero\n");
    }
  else if (x == 2)
    {
      printf ("two\n");
    }
  else
    {
      printf ("no match\n");
    }
  return 0;
}


Linux的風格
brook@ctc-desktop:~$ indent -linux -st xx.c
#include <stdio.h>

int main(int argc, char *argv[])
{
        int x;
        for (x = 0; x < 10; x++) {
                printf("%d\n", x);
        }
        switch (x) {
        case 1:
                printf("one\n");
                break;
        default:
                printf("default\n");
        }
        if (x == 0) {
                printf("zero\n");
        } else if (x == 2) {
                printf("two\n");
        } else {
                printf("no match\n");
        }
        return 0;
}


我常用的選項 -st, --standard-output
寫到stdout去, 可以先在螢幕上確認是否是自己要的風格.
-i, --indent-level
縮排要用幾個空白.
-cli, --case-indentation
case要往內縮幾個空白
-nut, --no-tabs
使用空白取代tab


個人偏愛的風格 indent -kr -st -i4 -cli4 -nut xx.c
brook@ctc-desktop:~$ indent -kr -st -i4 -cli4 xx.c
#include <stdio.h>
int main(int argc, char *argv[])
{
    int x;
    for (x = 0; x < 10; x++) {
        printf("%d\n", x);
    }
    switch (x) {
        case 1:
            printf("one\n");
            break;
        default:
            printf("default\n");
    }
    if (x == 0) {
        printf("zero\n");
    } else if (x == 2) {
        printf("two\n");
    } else {
        printf("no match\n");
    }
    return 0;
}


熱門文章